Build a dinosaur runner game with Deno, pt. 4

This series of blog posts will guide you through building a simple browser-based dinosaur runner game using Deno.
- Setup a basic project
- Game loop, canvas, and controls
- Obstacles and collision detection
- Databases and global leaderboards
- Player profiles, customization, and live tuning
- Observability, metrics, and alerting
Database Integration & Global Leaderboards
Now that we have a fully playable endless runner, it is time to persist scores. In this post, we will add a database, expose a leaderboard API, and render those rankings inside the UI. Later we can build on this foundation to add player profiles and make the leaderboard global across multiple sessions and devices.
What you’ll learn
By the end of this stage you will have:
- Set up a PostgreSQL database (locally and in Deno Deploy).
- Created API endpoints to submit, fetch, and rank player scores.
- Built a dedicated leaderboard page that auto-refreshes with live data.
1. Build the leaderboard page
We’ll start by creating a new HTML page to display the leaderboard. For now this will only display your top score, but in later stages we will enhance it with global rankings once we introduce player profile settings.
Create a new file called public/leaderboard.html and add the following:
<!DOCTYPE html>
<html lang="en">
  <head>
    <meta charset="UTF-8" />
    <meta name="viewport" content="width=device-width, initial-scale=1.0" />
    <link rel="stylesheet" href="css/styles.css" />
    <link rel="icon" href="favicon.ico" type="image/x-icon" />
    <title>Dino Runner - Global Leaderboard</title>
  </head>
  <body>
    <main class="leaderboard-container">
      <header>
        <h1>🏆 Global Leaderboard</h1>
        <p>Top players from around the world</p>
      </header>

      <nav>
        <a href="/" class="btn">🎮 Play Game</a>
        <button
          onclick="refreshLeaderboard()"
          class="btn btn-secondary refresh-btn"
        >
          🔄 Refresh
        </button>
      </nav>

      <section class="container" id="leaderboard-content">
        <div class="loading">
          <div>🦕 Loading leaderboard...</div>
        </div>
      </section>

      <div class="last-updated" id="last-updated"></div>
    </main>

    <script src="js/leaderboard.js"></script>
  </body>
</html>
We can also add some basic styling in public/css/styles.css to make the
leaderboard look nice:
/* Stage 4: Leaderboard CSS */

.leaderboard-list {
  padding: 0;
  border: 1px solid var(--secondary);
}

.leaderboard-entry {
  display: flex;
  padding: 0.5rem 1.5rem;
  justify-content: space-between;
  border-bottom: 1px solid var(--secondary);
}

.leaderboard-entry:last-child {
  border-bottom: none;
}

.leaderboard-rank {
  font-weight: bold;
  color: var(--dark);
  width: 30px;
}

.leaderboard-rank.gold {
  color: #ffd700;
}

.leaderboard-rank.silver {
  color: #c0c0c0;
}

.leaderboard-rank.bronze {
  color: #cd7f32;
}

.leaderboard-name {
  flex-grow: 1;
  margin-left: 15px;
  font-weight: 500;
}

.leaderboard-score {
  font-weight: bold;
  color: var(--primary-dark);
}

.avatar {
  display: inline-block;
  width: 40px;
  height: 40px;
  border-radius: 50%;
  background-color: var(--secondary);
  color: var(--dark);
  text-align: center;
  line-height: 40px;
  font-weight: bold;
}

.loading {
  text-align: center;
  padding: 20px;
  color: var(--dark);
  font-style: italic;
}

/* Leaderboard grid */

.leaderboard-grid {
  display: grid;
  grid-template-columns: repeat(5, auto);
  gap: 1rem;
  margin-top: 1rem;
}

.player {
  font-weight: bold;
}

.tl {
  text-align: left;
}
And finally, we’ll add a link to the leaderboard page into the index page. Open
public/index.html and add a link under the controls section:
<a href="/leaderboard" class="btn btn-primary btn-block"
>View the Leaderboard</a>
Serve the leaderboard page by short-circuiting Oak before the regular static
middleware takes over. In your main.ts file, add the following before the
static file serving middleware:
app.use(async (context, next) => {
  if (context.request.url.pathname === "/leaderboard") {
    await context.send({
      root: `${Deno.cwd()}/public`,
      path: "leaderboard.html",
    });
    return;
  }

  await next();
});
2. Wire up the leaderboard script
Create public/js/leaderboard.js to fetch and render leaderboard rows every 30
seconds. For now we’ll only see one row, but later we will expand this to show
global rankings.
let leaderboardData = [];

async function loadLeaderboard() {
  try {
    const response = await fetch("/api/leaderboard?limit=50");
    const data = await response.json();

    if (data.success && data.leaderboard) {
      leaderboardData = data.leaderboard;
      renderLeaderboard();
      updateLastUpdated();
      return;
    }

    throw new Error(data.error || "Failed to load leaderboard");
  } catch (error) {
    console.error("Error loading leaderboard", error);
    renderError();
  }
}

function renderLeaderboard() {
  const content = document.getElementById("leaderboard-content");

  if (leaderboardData.length === 0) {
    content.innerHTML = `
      <div class="empty-state">
        <h3>No scores yet!</h3>
        <p>Be the first to set a high score!</p>
        <a href="/" class="btn">Start Playing</a>
      </div>`;
    return;
  }

  const tableHTML = `
    <div class="leaderboard-grid">
      <h4 class="tl">Rank</h4>
      <h4 class="tl">Player</h4>
      <h4>Score</h4>
      <h4>Obstacles</h4>
      <h4>Date</h4>
      ${
    leaderboardData
      .map(
        (entry) => `
          <span class="tl rank-${
          entry.rank <= 3 ? entry.rank : ""
        }">#${entry.rank}</span>
          <div class="player tl">
            <span class="avatar" style="background-color: ${
          playerInitialsToColor(entry.playerName)
        };">
              ${getPlayerInitials(entry.playerName)}
            </span>
            <span>${escapeHtml(entry.playerName)}</span>
          </div>
          <span>${entry.score.toLocaleString()}</span>
          <span>${entry.obstaclesAvoided || 0}</span>
          <span>${formatDate(entry.date)}</span>
        `,
      )
      .join("")
  }
    </div>`;

  content.innerHTML = tableHTML;
}

function renderError() {
  const content = document.getElementById("leaderboard-content");
  content.innerHTML = `
    <div class="error">
      <h3>Unable to load leaderboard</h3>
      <p>Please check your connection and try again.</p>
      <button onclick="refreshLeaderboard()" class="btn refresh-btn">Try Again</button>
    </div>`;
}

function getPlayerInitials(name) {
  return name.slice(0, 2).toUpperCase();
}

function playerInitialsToColor(name) {
  const firstChar = name.charCodeAt(0);
  const hue = (firstChar * 7) % 360;
  return `hsl(${hue}, 70%, 50%)`;
}

function escapeHtml(text) {
  const div = document.createElement("div");
  div.textContent = text;
  return div.innerHTML;
}

function formatDate(dateString) {
  const date = new Date(dateString);
  return date.toLocaleDateString("en-US", {
    month: "short",
    day: "numeric",
    hour: "2-digit",
    minute: "2-digit",
  });
}

function updateLastUpdated() {
  const now = new Date();
  document.getElementById("last-updated").textContent =
    `Last updated: ${now.toLocaleTimeString()}`;
}

async function refreshLeaderboard() {
  const content = document.getElementById("leaderboard-content");
  content.innerHTML = `
    <div class="loading">
      <div>Refreshing leaderboard...</div>
    </div>`;
  await loadLeaderboard();
}

setInterval(loadLeaderboard, 30000);
document.addEventListener("DOMContentLoaded", loadLeaderboard);
The helper wraps everything needed to keep the leaderboard fresh client-side:
refreshLeaderboard() swaps in a loading state, loadLeaderboard() fetches the
latest scores, and the rendering helpers sanitize incoming values, format dates,
and hydrate the DOM so you never risk injection issues. A setInterval and a
DOMContentLoaded hook ensure the scoreboard initializes when the page loads
and keeps polling every 30 seconds without user interaction.
3. Provision a managed PostgreSQL
Head to the Deno Deploy dashboard and create a new managed PostgreSQL database:
- Navigate to Databases → + Provision Database.
- Choose Provision New Database → Prisma Postgres.
- Provide a slug such as
dino-runner-db, pick a region close to your players, and click Provision Database. - After the database is ready, click Assign and attach it to your Dino Runner project so Deploy automatically injects credentials.
4. Configure local development
With the [deno –tunnel`](https://docs.deno.com/runtime/reference/cli/run/#options-tunnel) command, you can connect to your managed database from your local machine without needing to set up environment variables or other configuration.
Simply use the run command with the --tunnel flag and Deno will do the rest.
deno run --tunnel devUsing a Database url
If you prefer, you can also connect to your managed database using a standard
DATABASE_URL connection string (for example if you’re using a local Postgres
instance for development). Set up a DATABASE_URL environment variable in your
.env file. To get the connection string for your managed database, go to the
Deno Deploy dashboard, navigate to your database, and copy the URL from the
Databases tab:
Then, paste it into your .env file. Be sure to append ?sslmode=require to
the end of your connection string, which ensures the connection is encrypted via
SSL/TLS:
DATABASE_URL=postgresql://your_db_url@db.prisma.io:port?sslmode=require5. Create the database connection helper
Place the following file at src/database/connection.ts. It lazily creates a
connection pool and gracefully degrades through three credential sources.
import { Pool } from "npm:pg";

let pool: Pool | null = null;

export function getDatabase(): Pool {
  if (pool) {
    return pool;
  }

  const databaseUrl = Deno.env.get("DATABASE_URL");

  if (databaseUrl) {
    console.log("🔧 Using DATABASE_URL for connection pool");
    pool = new Pool({ connectionString: databaseUrl, max: 10 });
    return pool;
  }

  const pgHost = Deno.env.get("PGHOST");
  const pgUser = Deno.env.get("PGUSER");

  if (pgHost && pgUser) {
    console.log("🔧 Using Deno Deploy PostgreSQL environment variables");
    pool = new Pool({
      host: pgHost,
      user: pgUser,
      password: Deno.env.get("PGPASSWORD") || undefined,
      database: Deno.env.get("PGDATABASE") || "postgres",
      port: parseInt(Deno.env.get("PGPORT") || "5432"),
      max: 10,
    });
    return pool;
  }

  console.log("🔧 Using custom DB environment variables (local development)");
  pool = new Pool({
    host: Deno.env.get("DB_HOST") || "localhost",
    user: Deno.env.get("DB_USER") || "postgres",
    password: Deno.env.get("DB_PASSWORD") || undefined,
    database: Deno.env.get("DB_NAME") || "dino_runner",
    port: parseInt(Deno.env.get("DB_PORT") || "5432"),
    max: 10,
  });

  console.log("Database pool created successfully");
  return pool;
}

export async function closeDatabase(): Promise<void> {
  if (!pool) return;
  await pool.end();
  pool = null;
  console.log("Database pool closed");
}
At the bottom of the same file, lets release clients back to the pool:
const db = getDatabase();
const client = await db.connect();
try {
  const result = await client.query("SELECT 1");
  console.log(result.rows);
} finally {
  client.release();
}
6. Define the schema
Create src/database/schema.sql (or a migration) to store scores and the
metadata we collect from the game client.
CREATE TABLE IF NOT EXISTS scores (
  id BIGSERIAL PRIMARY KEY,
  player_name TEXT NOT NULL,
  score INTEGER NOT NULL CHECK (score >= 0),
  obstacles_avoided INTEGER DEFAULT 0,
  game_duration_ms INTEGER DEFAULT 0,
  max_speed NUMERIC(6, 2) DEFAULT 0,
  created_at TIMESTAMPTZ DEFAULT NOW()
);

CREATE INDEX IF NOT EXISTS scores_score_idx
  ON scores (score DESC, created_at DESC);
7. Migrate the database
Make a simple migration script to run the schema against the database. This
script, which will create the necessary tables and columns for the global
leaderboard, must be executed before the game starts. Create
src/database/migration.ts:
import { getDatabase } from "./connection.ts";

export async function initializeDatabase(): Promise<void> {
  const pool = getDatabase();

  console.log("🚀 Initializing database schema...");

  const schema = await Deno.readTextFile("./src/database/schema.sql");

  // Use pool.query() for schema initialization with npm:pg
  const client = await pool.connect();
  try {
    await client.query(schema);
    console.log("✅ Database schema initialized successfully");
  } finally {
    client.release(); // Release client back to pool
  }
}

export function runMigrations(): void {
  // Future migrations can be added here
  console.log("📦 No pending migrations");
}
Then, call it from your main.ts before starting the server:
import { initializeDatabase } from "./database/migration.ts";
await initializeDatabase();
8. Implement leaderboard API routes
We will have to add a router to handle API routes for /api/leaderboard and
/api/scores for returning the right data for the leaderboard and scores. Let’s
create the file /src/routes/leaderboard.routes.ts and fill it with the below:
import { Router } from "jsr:@oak/oak/router";
import { getDatabase } from "../database/connection.ts";

const leaderboardRouter = new Router();

leaderboardRouter
  .get("/api/leaderboard", async (context) => {
    const limit = Number(context.request.url.searchParams.get("limit")) || 10;
    const client = await getDatabase().connect();

    try {
      const result = await client.query(
        "SELECT player_name, score, obstacles_avoided, created_at FROM scores ORDER BY score DESC, created_at ASC LIMIT $1",
        [limit],
      );

      const leaderboard = result.rows.map((row, index) => ({
        rank: index + 1,
        playerName: row.player_name,
        score: Number(row.score),
        obstaclesAvoided: Number(row.obstacles_avoided || 0),
        date: row.created_at,
      }));

      context.response.body = { success: true, leaderboard };
    } finally {
      client.release();
    }
  })
  .post("/api/scores", async (context) => {
    const body = await context.request.body({ type: "json" }).value;
    const { playerName, score, obstaclesAvoided = 0, gameDuration, maxSpeed } =
      body;

    if (!playerName || typeof score !== "number") {
      context.response.status = 400;
      context.response.body = { success: false, error: "Invalid payload" };
      return;
    }

    const client = await getDatabase().connect();
    try {
      const insertResult = await client.query(
        `INSERT INTO scores (player_name, score, obstacles_avoided, game_duration_ms, max_speed)
         VALUES ($1, $2, $3, $4, $5)
         RETURNING id`,
        [playerName, score, obstaclesAvoided, gameDuration ?? 0, maxSpeed ?? 0],
      );

      const rankResult = await client.query(
        `SELECT COUNT(*) + 1 AS rank
         FROM scores
         WHERE score > $1 OR (score = $1 AND created_at < NOW())`,
        [score],
      );

      context.response.body = {
        success: true,
        id: Number(insertResult.rows[0].id),
        globalRank: Number(rankResult.rows[0].rank) || 1,
        isNewRecord: Number(rankResult.rows[0].rank) === 1,
      };
    } finally {
      client.release();
    }
  });

export default leaderboardRouter;
BigInt note: PostgreSQL numeric types can bubble up as JavaScript bigint.
Convert them to Number (as shown above) before serializing to JSON to avoid
runtime errors.
After you have created leaderboardRouter, we’ll need to import that into
main.ts and include those routes in our app:
// Other logic...

import leaderboardRouter from "./routes/leaderboard.routes.ts";

// ...

app.use(leaderboardRouter.routes());
app.use(leaderboardRouter.allowedMethods());

// ...
9. Push scores from the game client
Extend public/js/game.js with a helper function submitScoreToDatabase that
posts the score after each run.
Note that for now, you can hard code your playerName, but in the next lesson,
we will show you how you can create player profiles that allow users to update
it themselves.
 async submitScoreToDatabase(gameDuration) {
    // if (!this.playerName) return;
    this.playerName = "Jo";

    try {
      const response = await fetch("/api/scores", {
        method: "POST",
        headers: { "Content-Type": "application/json" },
        body: JSON.stringify({
          playerName: this.playerName,
          score: Math.floor(this.score),
          obstaclesAvoided: this.obstaclesAvoided,
          gameDuration
        })
      });

      if (!response.ok) throw new Error("Failed to submit score");

      const data = await response.json();
      if (data.isNewRecord) {
        console.log("🏆 NEW GLOBAL RECORD!");
        if (typeof this.showNewRecordMessage === "function") {
          this.showNewRecordMessage();
        }
      }

      console.log(`Score submitted! Global rank: #${data.globalRank}`);
      if (typeof this.loadGlobalLeaderboard === "function") {
        this.loadGlobalLeaderboard();
      }
    } catch (error) {
      console.error("Failed to submit score", error);
    }
  }
Then update the game over logic to call this function:
We will have to make a few other updates to public/js/game.js so that we can
pass the right information in a function call in submitScoreToDatabase. First,
let’s update startGame to instantiate a new private variable, gameStartTime,
which will be used to calculate the duration the player played in a game.
// ...
startGame() {
  // Instantiating other variables...
  this.gameStartTime = Date.now();
}
Next, we’ll have to update our gameOver logic to calculate gameDuration and
to call submitScoreToDatabase:
gameOver() {
  // existing game over logic...

  const gameDuration = Math.floor((Date.now() - this.gameStartTime) / 1000);
  this.submitScoreToDatabase(gameDuration);
}
Once you have done that, we can start the server with deno task dev, play a
round, and then see our score on the global leaderboard:
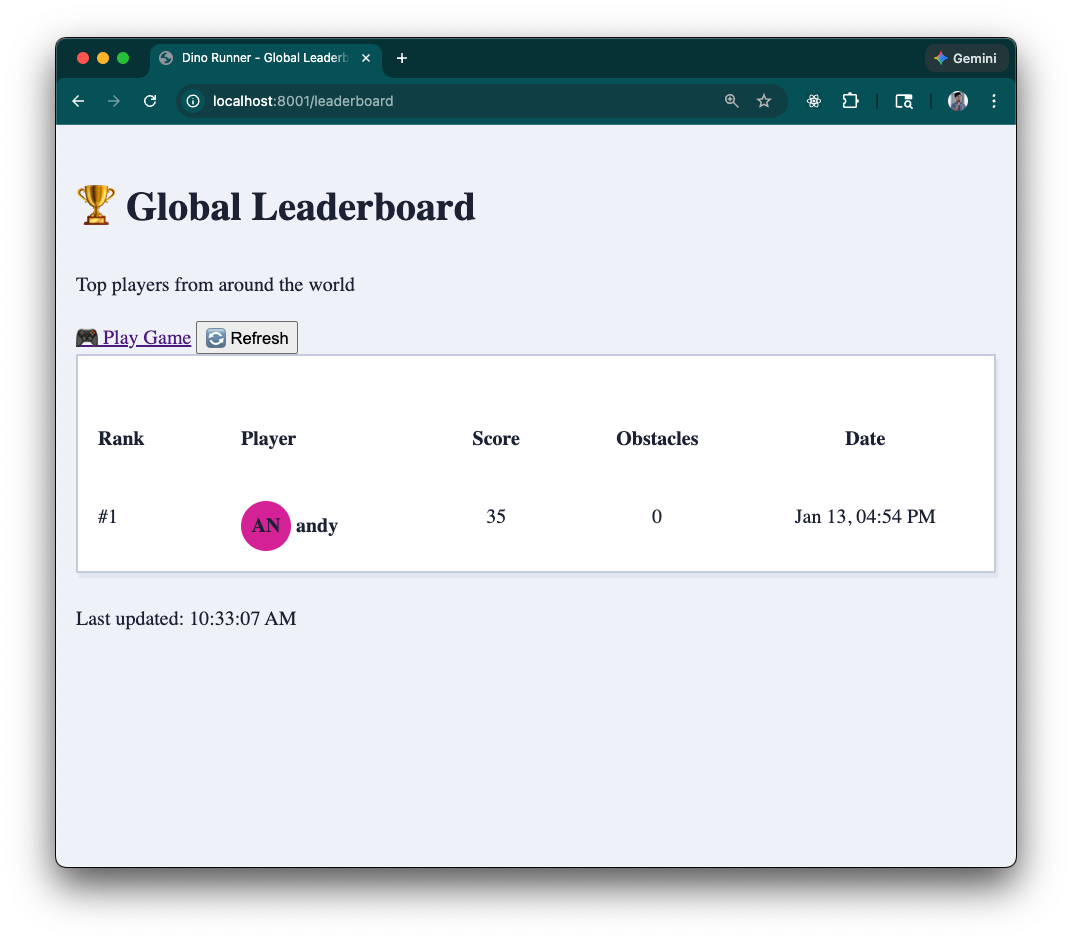
Project structure recap
Runner Game/
├── src/
│   ├── database/
│   │   ├── connection.ts
│   │   └── schema.sql
│   ├── middleware/
│   ├── routes/
│   │   └── leaderboard.routes.ts
│   └── main.ts
├── public/
│   ├── index.html
│   ├── leaderboard.html
│   └── js/
│       ├── game.js
│       └── leaderboard.js
├── deno.json
└── README.md
Stage 4 accomplishments
✅ Persistent PostgreSQL storage for scores and analytics metrics.
✅ Global leaderboard API (GET /api/leaderboard, POST /api/scores) with rank
calculation.
✅ Dedicated leaderboard page plus in-game auto-refresh to keep data in sync.
✅ Robust connection pooling, environment-variable fallbacks, and BigInt-safe serialization.
What’s next?
In Stage 5, we will lean into personalization: player profiles, cosmetic customization. Once we have player profiles, we can make the leaderboard truly global by associating scores with user accounts. We’ll update our database to store user preferences and scores.