Build a REST API with Express, TypeScript, and Deno, pt. 2
In the first part of this tutorial, we were up and running with Deno + Express with no config necessary and a couple of working routes in just a few minutes. If you happened upon this part of the tutorial first, we suggest going back and reading the first one and cloning the companion code repo.
In this episode, we’ll add some tests and benchmarks to measure the impact code changes will have on our API service operates. Then, we’ll build and launch a Docker image.
From this point, you can pick-and-choose what you want from the companion repository, and then deploy your own API via GitOps on your own cluster or use the Docker image to run it on any host that works with Docker.
 Feel free to watch the
video walkthrough of this post.
Feel free to watch the
video walkthrough of this post.
If you want to skip to the code, you can do so here.
Getting Tests In Place For Our Express Routes
We want to make sure our routes return what we expect, so we’ll use Deno’s built-in testing facility to make sure we’re covered.
We create a file called main_tests.ts (see the documentation for more on
how Deno searches for tests and benchmarks to run) with the following code:
import { assertEquals } from "https://deno.land/std@0.182.0/testing/asserts.ts";
const stagingUrl = Deno.env.get("STAGING_URL") || "http://localhost:3000";

Deno.test("Plural Users Route", async () => {
  const res = await fetch(`${stagingUrl}/users`);
  const response = await res.json();
  console.log(response);
  assertEquals(res.status, 200);
});

Deno.test("Single User Route & User Data", async () => {
  const res = await fetch(`${stagingUrl}/users/2`);
  const response = await res.json();
  assertEquals(res.status, 200);
  assertEquals(response.name, "Funmi");
});
Learn more about Deno’s built-in testing.
Our tests make requests, wait for the response code, and in the case of the
single-user call, verify that the correct data is returned for a specific call.
A very simple way to do this is just using fetch(), which is why we use async
functions.
Now, We Can Add Benchmarks!
Tests verify what the response contains, but how much time does it take to get a response? For this, we use benchmarks, which are also a very convenient part of Deno’s built-in toolchain.
Much like tests, Deno will automatically discover benchmarks to run based on the
_bench suffix. We create main_bench.ts so Deno knows these are the
benchmarks that correspond with the main module:
const stagingUrl = Deno.env.get("STAGING_URL") || "http://localhost:3000";

Deno.bench("Single User", async () => {
  await fetch(`${stagingUrl}/users/2`);
});

Deno.bench("All Users", async () => {
  await fetch(`${stagingUrl}/users`);
});
That’s all we have to do! Deno will handle running the tests, recording the times, and reporting the stats.
Note that we’re concerned with how long the requests take from start to finish only, not how long it takes the client to parse the response, so the benchmarks are deliberately leaky.
Deploying via Docker / GitOps
If you’ve got existing infrastructure that deploys from your repo / CI server to
a container, then everything needed is included in the repo. The first file,
docker-compose.yml specifies the details:
version: "3.9"

services:
  deno-express-api:
    container_name: deno-express-api
    image: deno
    restart: always
    build:
      context: .
      dockerfile: Dockerfile
      target: base
    ports:
      - "${PORT}:${PORT}"
And, for the build, we also have our Dockerfile:
FROM denoland/deno:latest as base

WORKDIR /app

COPY . ./

RUN deno cache main.ts

CMD ["task", "start"]
This file sets the work directory and copies everything in /app to root. The
command deno cache caches all dependencies with main.ts as the entrypoint.
Finally, it runs task start when the Docker container starts.
Note that we need only define task start on the command line, as we’ve already
defined this task in deno.jsonc:
{
  "tasks": {
    "dev": "deno run --allow-read --allow-net --allow-env --watch main.ts",
    "start": "deno run --allow-read --allow-net --allow-env main.ts"
  }
}
If your fork of the project requires additional permissions, remember to update them there. Now, we launch the container so we can run our tests and benchmarks against it:
$ docker compose up --build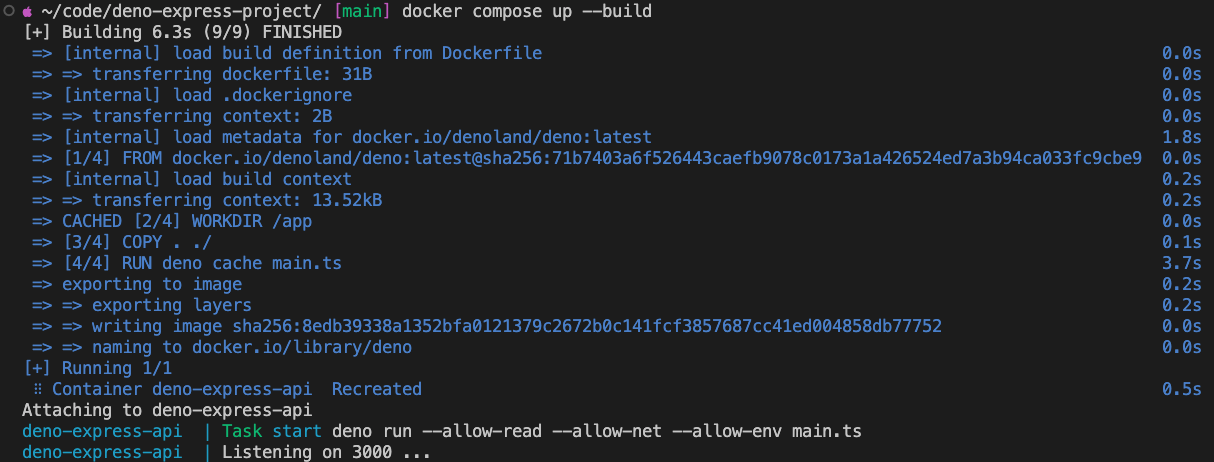
You can find the built container wherever you’ve configured Docker to store them; see the Docker desktop application if you’re not sure.
Running the Tests
Now that it’s up and running, we can run our tests via deno test -A, and see
that they pass:

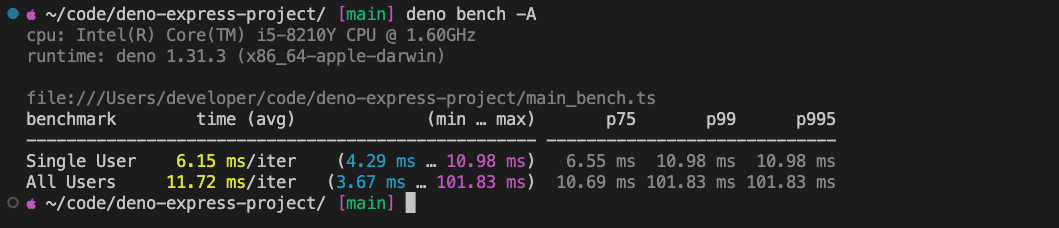
Great! We know the results come as expected, but how about when expected? We
run our benchmarks via deno bench -A:
Iterating
So, what can we do with that? Well, we left a lot of verbose logging on in the middleware, so an exercise we do in the video is disabling the console output and re-running the benchmarks, which does show a notable improvement.
If you want to follow along, open main.ts and look for the middleware function
that logs requests, reqLogger() and comment out the line as shown below:
const reqLogger = function (req: Request, _res: Response, next: NextFunction) {
  // better to implement real logging for production
  // console.info(`${req.method} request to "${req.url}" by ${req.hostname}`);
  next();
};
Then, start the development service with deno task dev, test your changes, and
either rebuild your image or push to your CI server.
It’s also worth mentioning that the numbers themselves will vary based on your local setup; I was recording on a MacBook Air while running them in the video.
You can also export the benchmark data in JSON using deno bench -A --json for
automated benchmarks and graphing.
What’s Next?
At this point you’re ready to connect a real data store, implement real routes, real tests, and real benchmarks.
To help structure your project, check out
express.Router.
Building production APIs also requires consideration of compression, authentication, and rate limiting options, so do take some time to thoroughly read the Express documentation.
We hope you found this useful and wish you luck with your project!
Stuck? Get help in our Discord!