My highlights from the new Deno Deploy

The team here at Deno has been working hard to improve Deno Deploy, rebuilding it from scratch to be a more flexible, powerful, and simpler hosting platform. You might have seen us making some noise about this in social media over the last few months.
We ran an early access program with the community testing it out and giving valuable feedback to help us make this huge update possible.
Now, this updated version of Deno Deploy is available to all, and I wanted to call out just a few of the reasons I’m excited about this update.
I’m no stranger to hosting and development platforms. I spent 7 years working at Netlify while they were defining big parts of the modern web hosting category and establishing many of the conventions and tools that developers now consider essential for web development projects. Those perspectives only add to my enthusiasm for the road ahead for Deno with Deploy.
Integrated CI/CD
tl;dr: You now have the option to run your builds within Deno Deploy, or on your own CI/CD
In the old Deno Deploy (still available as “Deploy Classic”) deploys happened by performing a build in your own system and then pushing that result to Deno Deploy. That might have been from your own CI/CD system or GitHub Actions. This option is still available, but now we also offer an optimized, high performance, integrated build environment to do this for you.
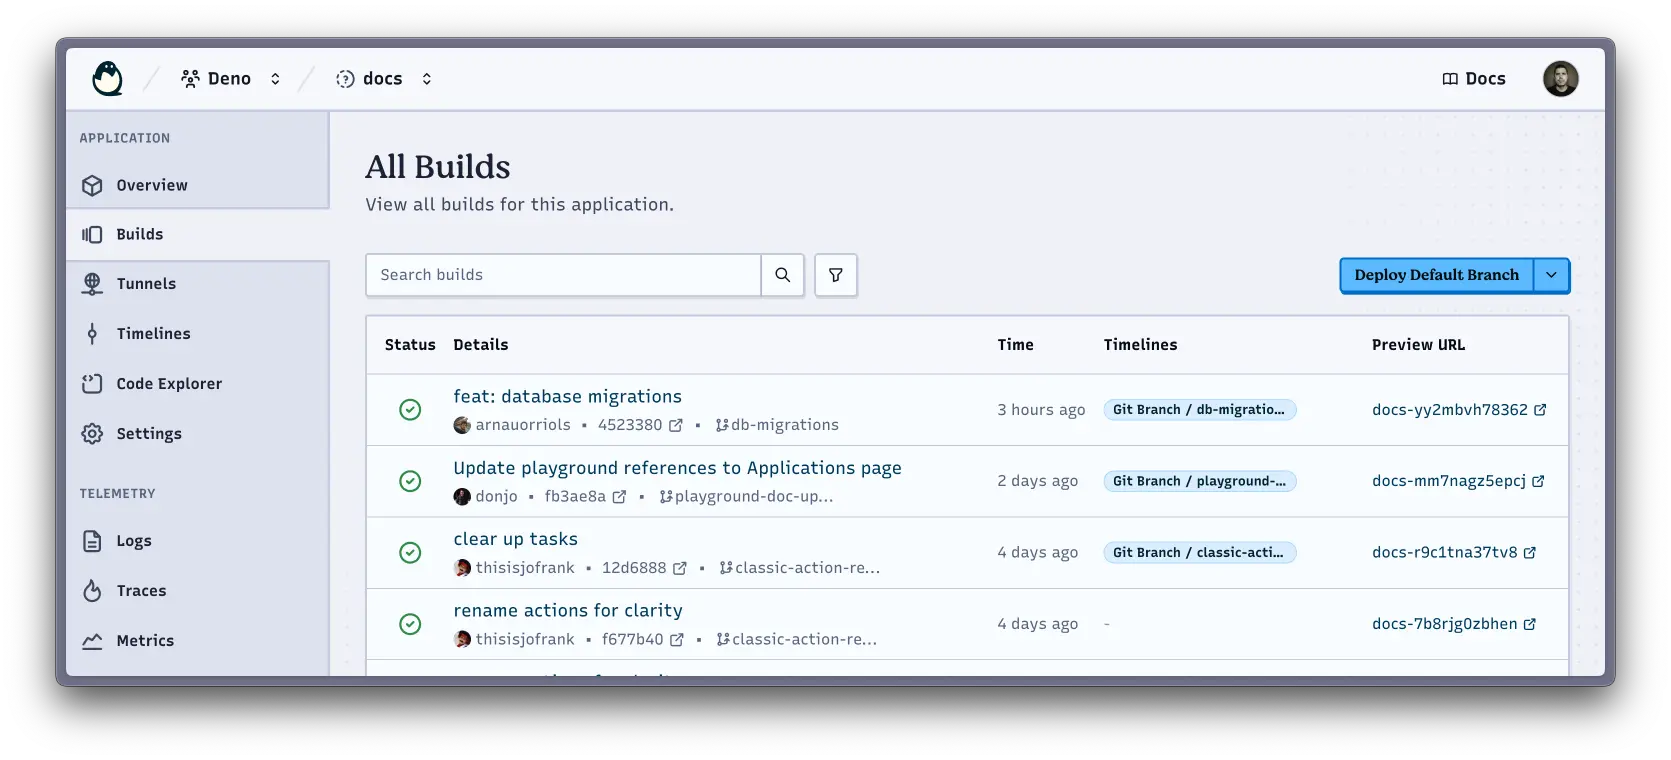
Our build pipeline offers great visibility into the deployment process and your automated builds. Just connect a GitHub repo to your application and off you go.
Naturally, this comes along with the ability to perform branch-deploys, preview builds, rollbacks, and all that good stuff that it would be hard to imagine working without these days.
This sort of feature has been available in other popular hosting platforms for a while, so it might not feel like news. But Deno Deploy also offers interesting controls over the hosting model, with ready-made optimisations for static or dynamic applications, and autodetection and optimisations for popular tools and frameworks.
Now you don’t have to choose between a simple and integrated CI/CD setup, and some of the more advanced architectural controls that we’re introducing.
Easy on-ramp for working with data
tl;dr: Quickly start with KV then easily graduate to a full database when necessary
Manageable access to, and admin of data services is often one of the first headaches when sites and applications increase in complexity. We wanted to simplify that.
Together, the Deno runtime and Deno Deploy offer simple access to reading and writing data to persistent storage via Deno KV, our popular KV store.
With surprisingly little code, you can begin managing data in a persistent data store:
const kv = await Deno.openKv();
// set some preferences data for a user called Ada
const result = await kv.set(["preferences", "ada"], {
username: "ada",
theme: "dark",
language: "en-US",
});
// get the data
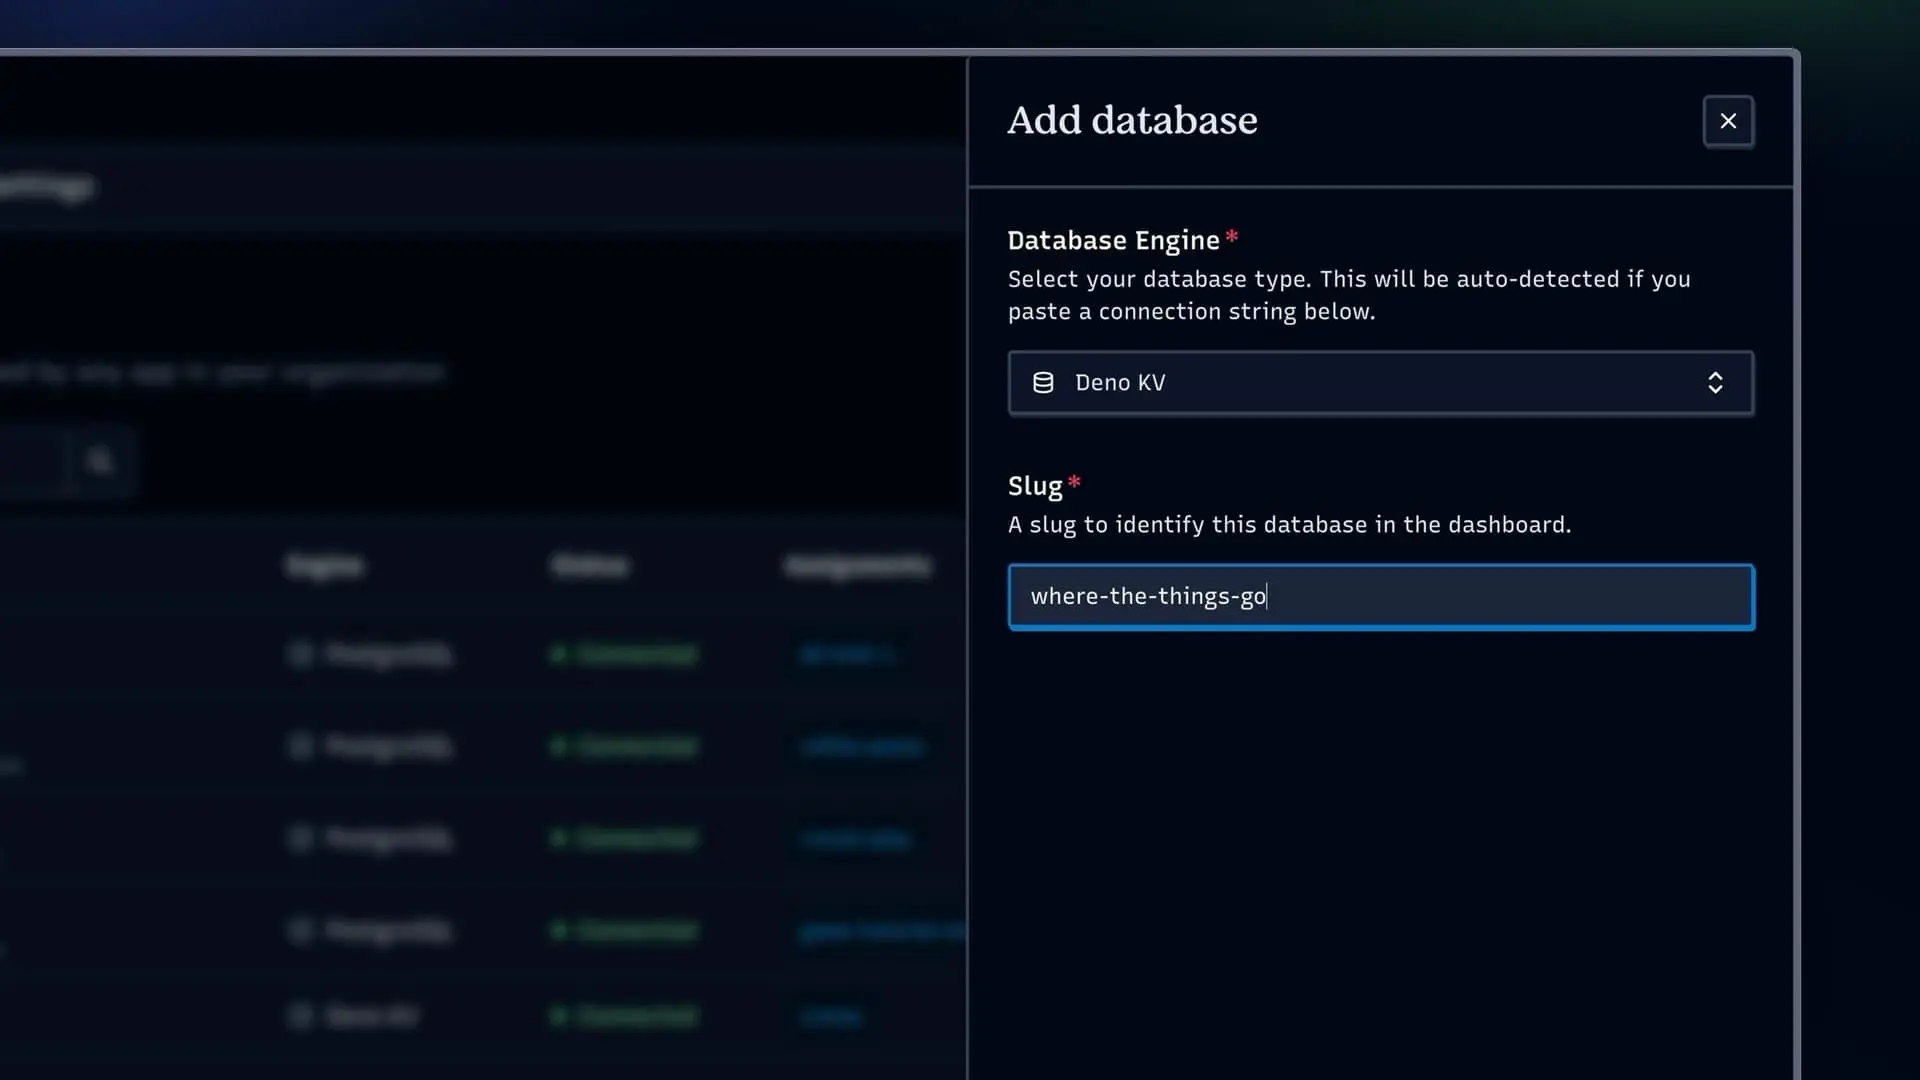
const entry = await kv.get(["preferences", "ada"]);When deployed to Deno Deploy, we now ask you to create and associate a KV store with your application. As your app grows, this makes it easy to move to a full data layer, like Postgres.
Postgres and more
tl;dr: Deploy organises your databases to prevent data pollution between environments
We’ve made it simple to link and provision databases from third-party database providers to your applications in ways that make sense for how developers work with code.
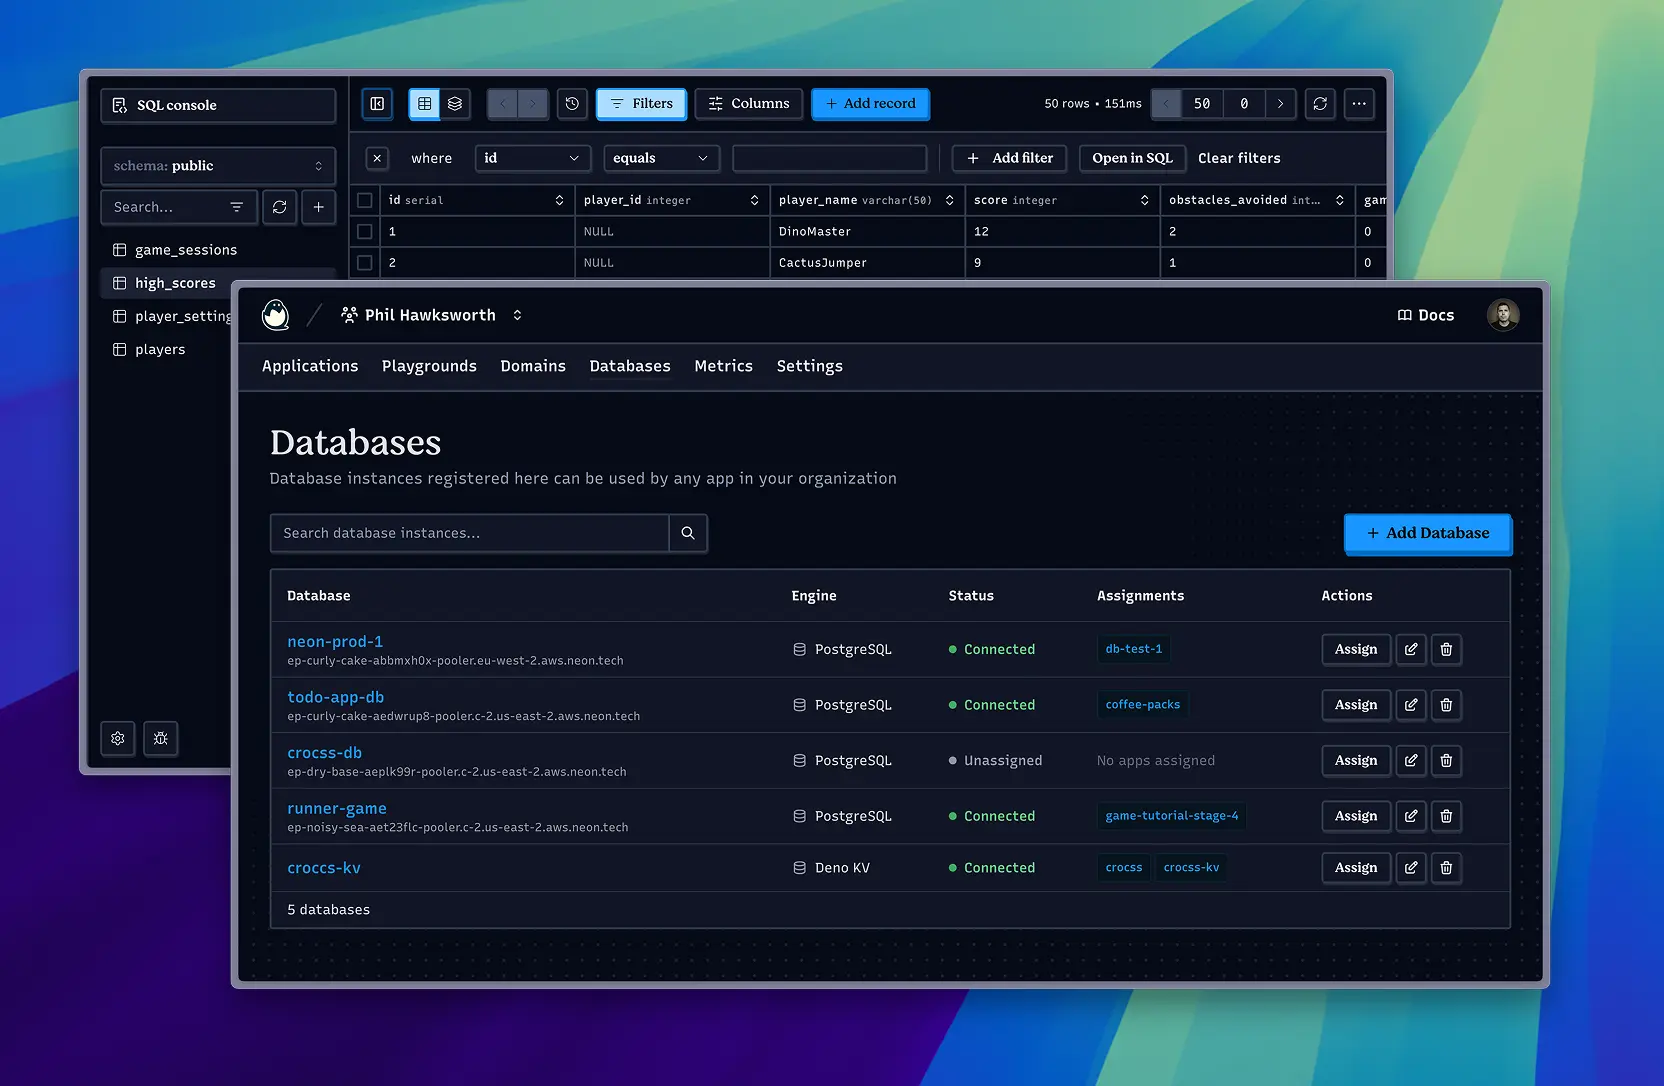
Our database integrations do some work behind the scenes to create database instances for each of your development and production contexts. That means that you can provision or allocate a database to one of your applications, and get separate databases for each environment.
It’s very helpful to know that the data in your development or staging environments will not pollute the data in your production environment. Deno Deploy just handles that for you. I love it!
This also means that your application code can remain the same in all contexts. Environment variables managed automatically by Deno Deploy in different contexts take care of all the scoping and targeting for you:
import { Pool } from "npm:pg";

// No configuration needed - Deno Deploy handles this automatically
const pool = new Pool();

Deno.serve(async () => {
  // Use the database
  const result = await pool.query("SELECT * FROM users WHERE id = $1", [123]);

  return new Response(JSON.stringify(result.rows), {
    headers: { "content-type": "application/json" },
  });
});
We’ve partnered with Prisma to provision new databases for free. Again, all from the Deno Deploy console. It’s an incredibly convenient way of adding databases to your applications.
We even have tooling for schema migrations to help as your applications grow.
Do you want to see a specific database supported? Let us know on social media or in Discord.
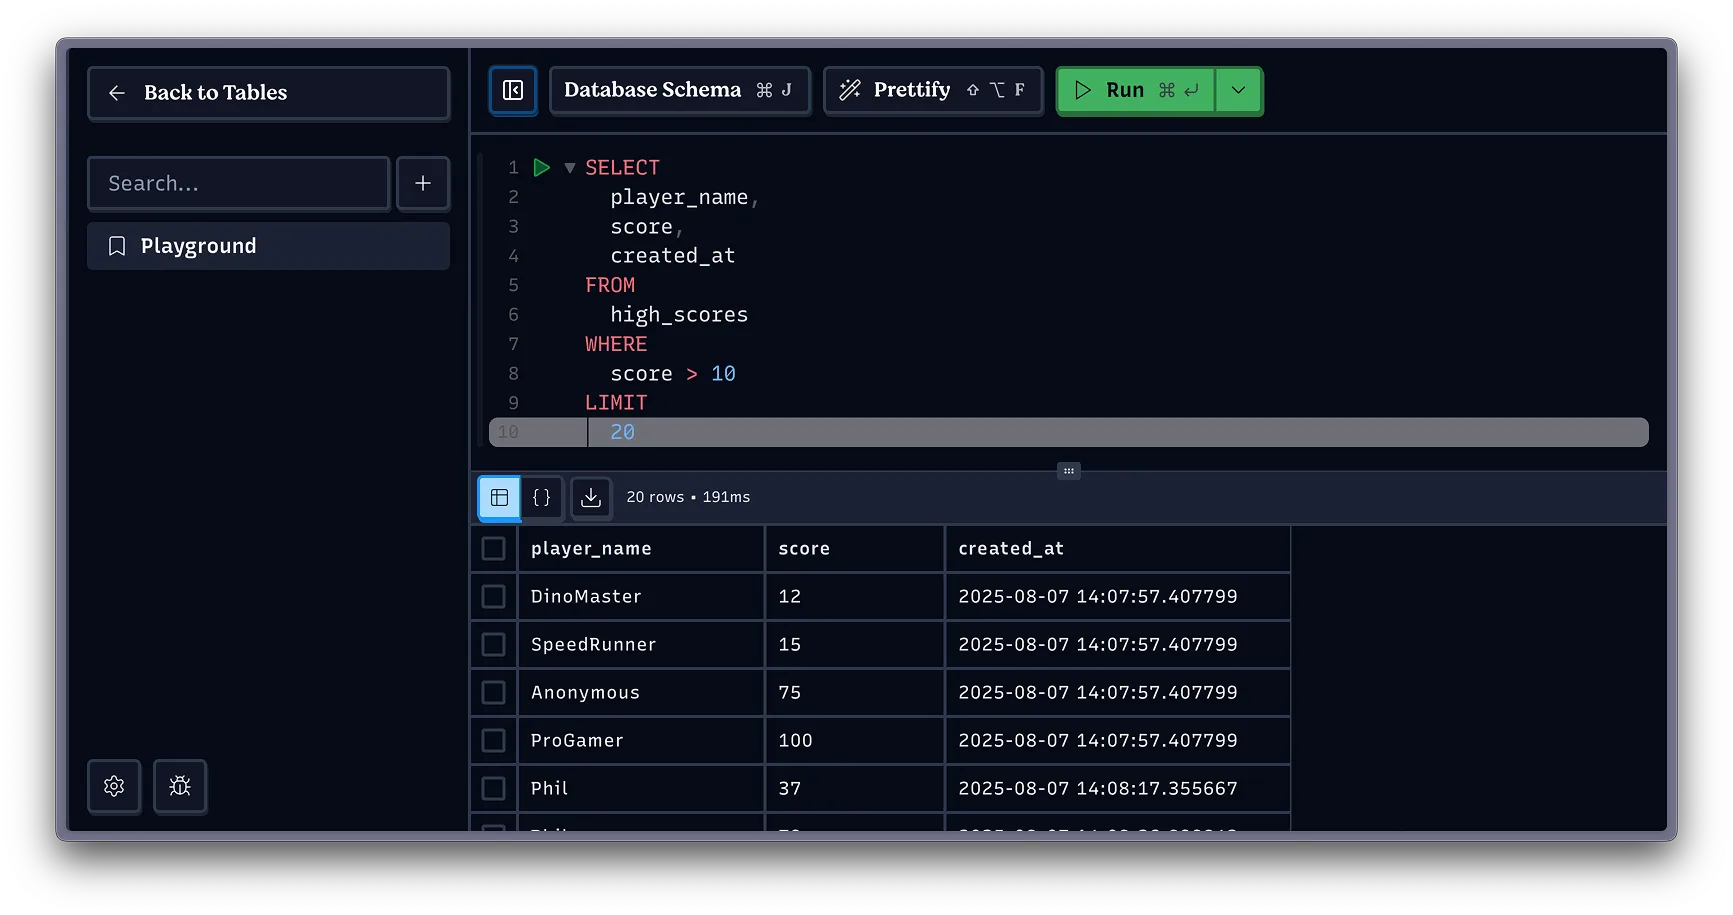
See your data
It’s also simple to visualize your data right there in the Deno Deploy console. The database explorer lets you poke around and query your data, across any of the contexts where your databases live.
Metrics
tl;dr: All apps get useful data and analytics, out of the box
Speaking of data, Deno Deploy surfaces a variety of metrics and analytics for every application. You don’t need to do anything to enable this beyond deploying your application.
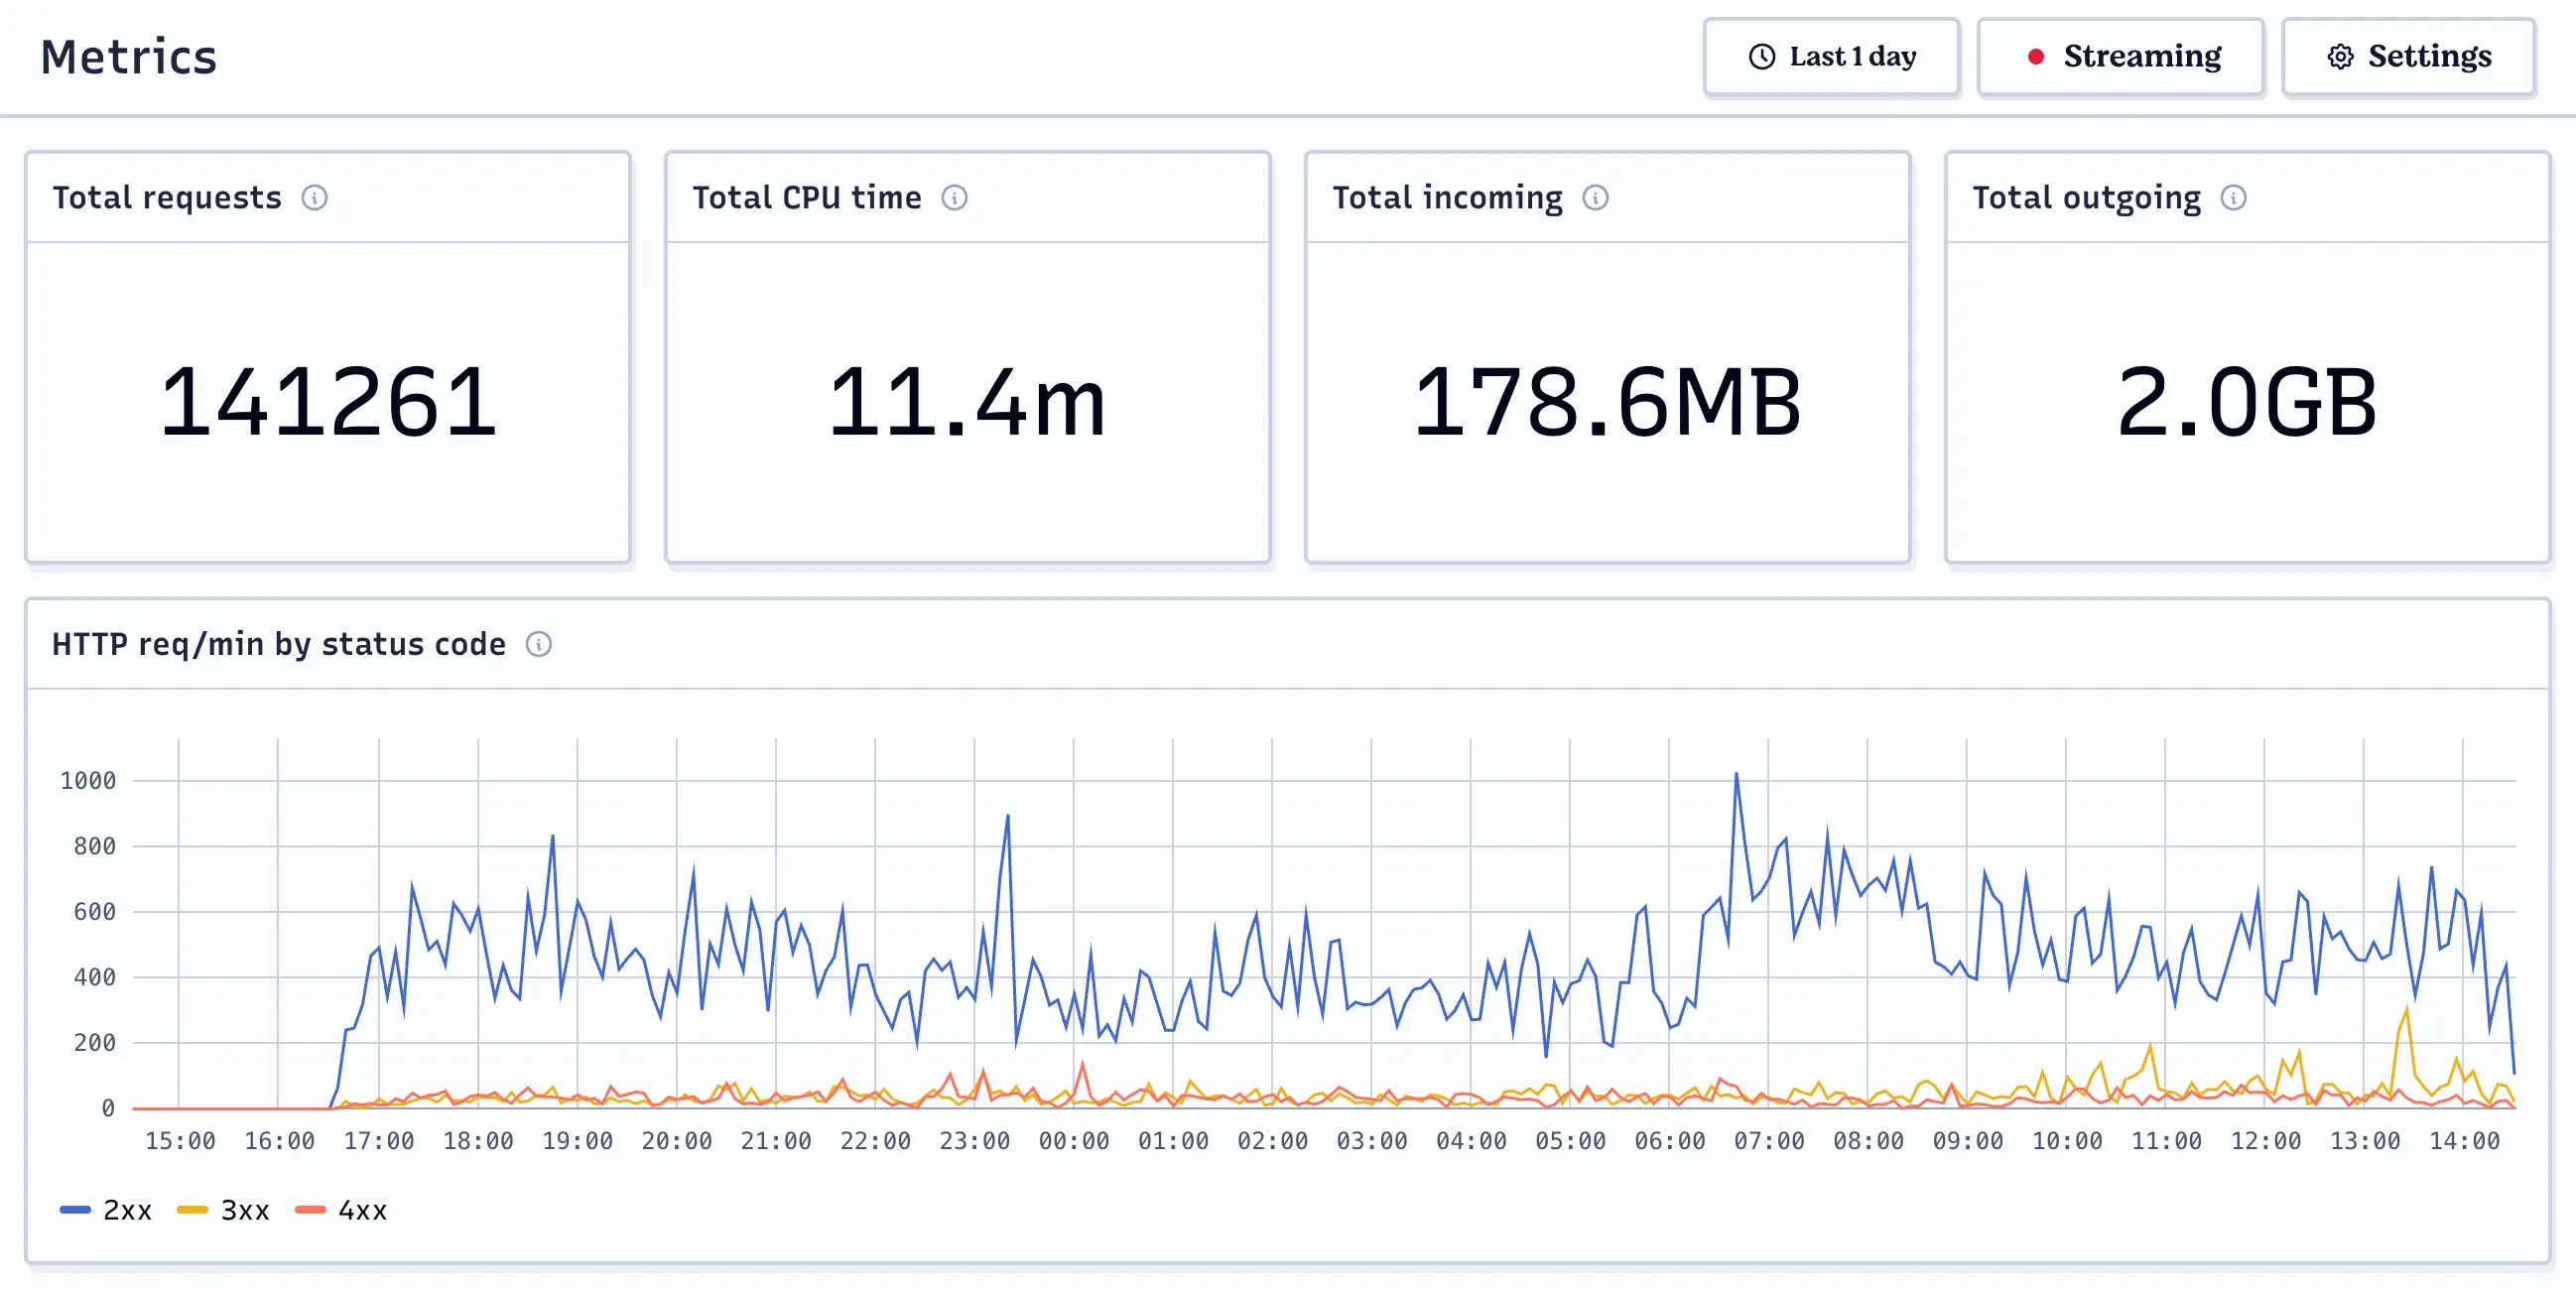
Deploy’s metrics are easy to explore with the interactive charting and a variety of presets and custom timeframes.
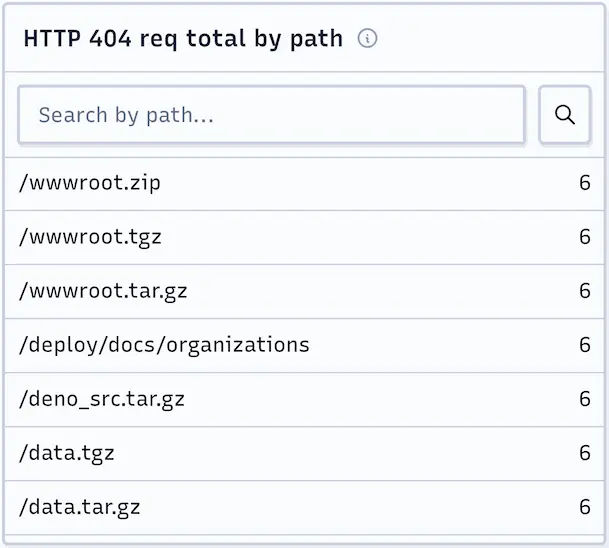
I also like getting access to the automatic 404 logging. The concise little 404 report which groups the 404s by path and orders them by frequency is very handy for catching routes that need handling.
Whether you are serving a static site or a dynamic app, there are useful metrics available here, including CPU time, memory usage, V8 garbage collection time, and allocated heap size.
Find all of these in the console for your applications.
Automatic observability with OTel
tl;dr: Easily observe and instrument your code with built-in support for OpenTelemetry
For more complex and critical applications, rich telemetry is vital. The built-in support for OpenTelemetry makes it simple for developers to observe what is happening in their applications.
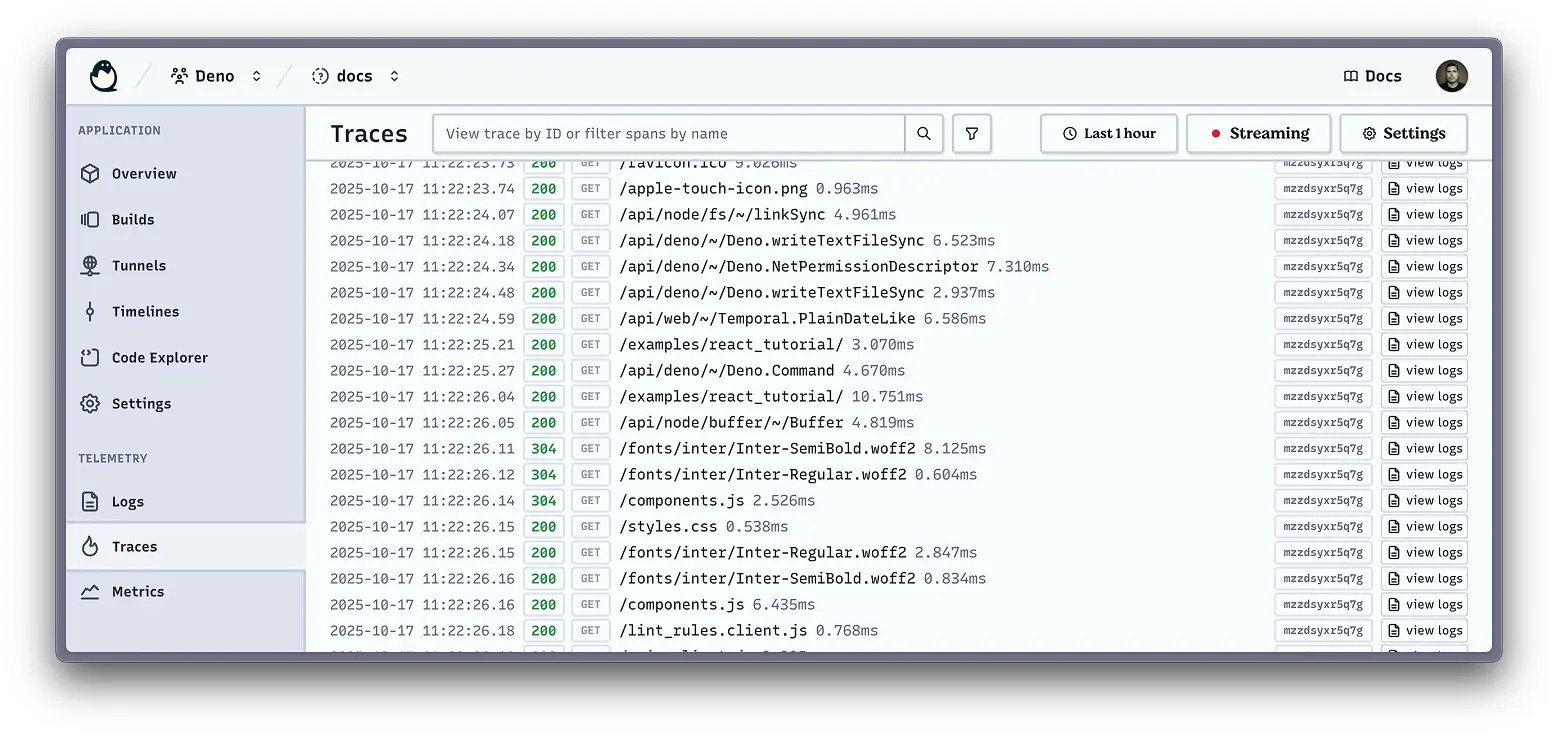
Any project hosted on Deno Deploy (even if there isn’t specific telemetry instrumentation code) will automatically show logs, traces, and metrics in the application console. But you can go further by connecting these to your own OTel service along with whatever additional instrumentation you specify in your code.
We shipped support for auto-instrumented observability and telemetry in Deno 2.2, and by hosting your project in Deno Deploy, the job of connecting your application to a tool like Grafana becomes very straight forward.
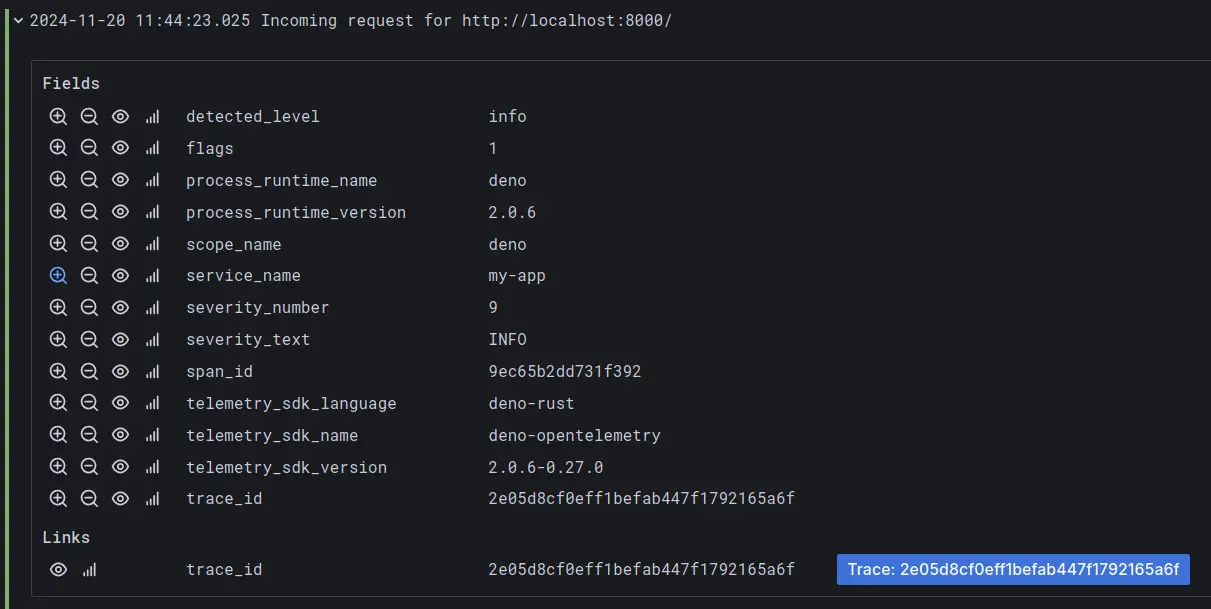
There is auto-instrumentation associated with incoming and outgoing HTTP requests.
Our examples have a number of tutorials on OTel to explore, including:
Application settings and env vars
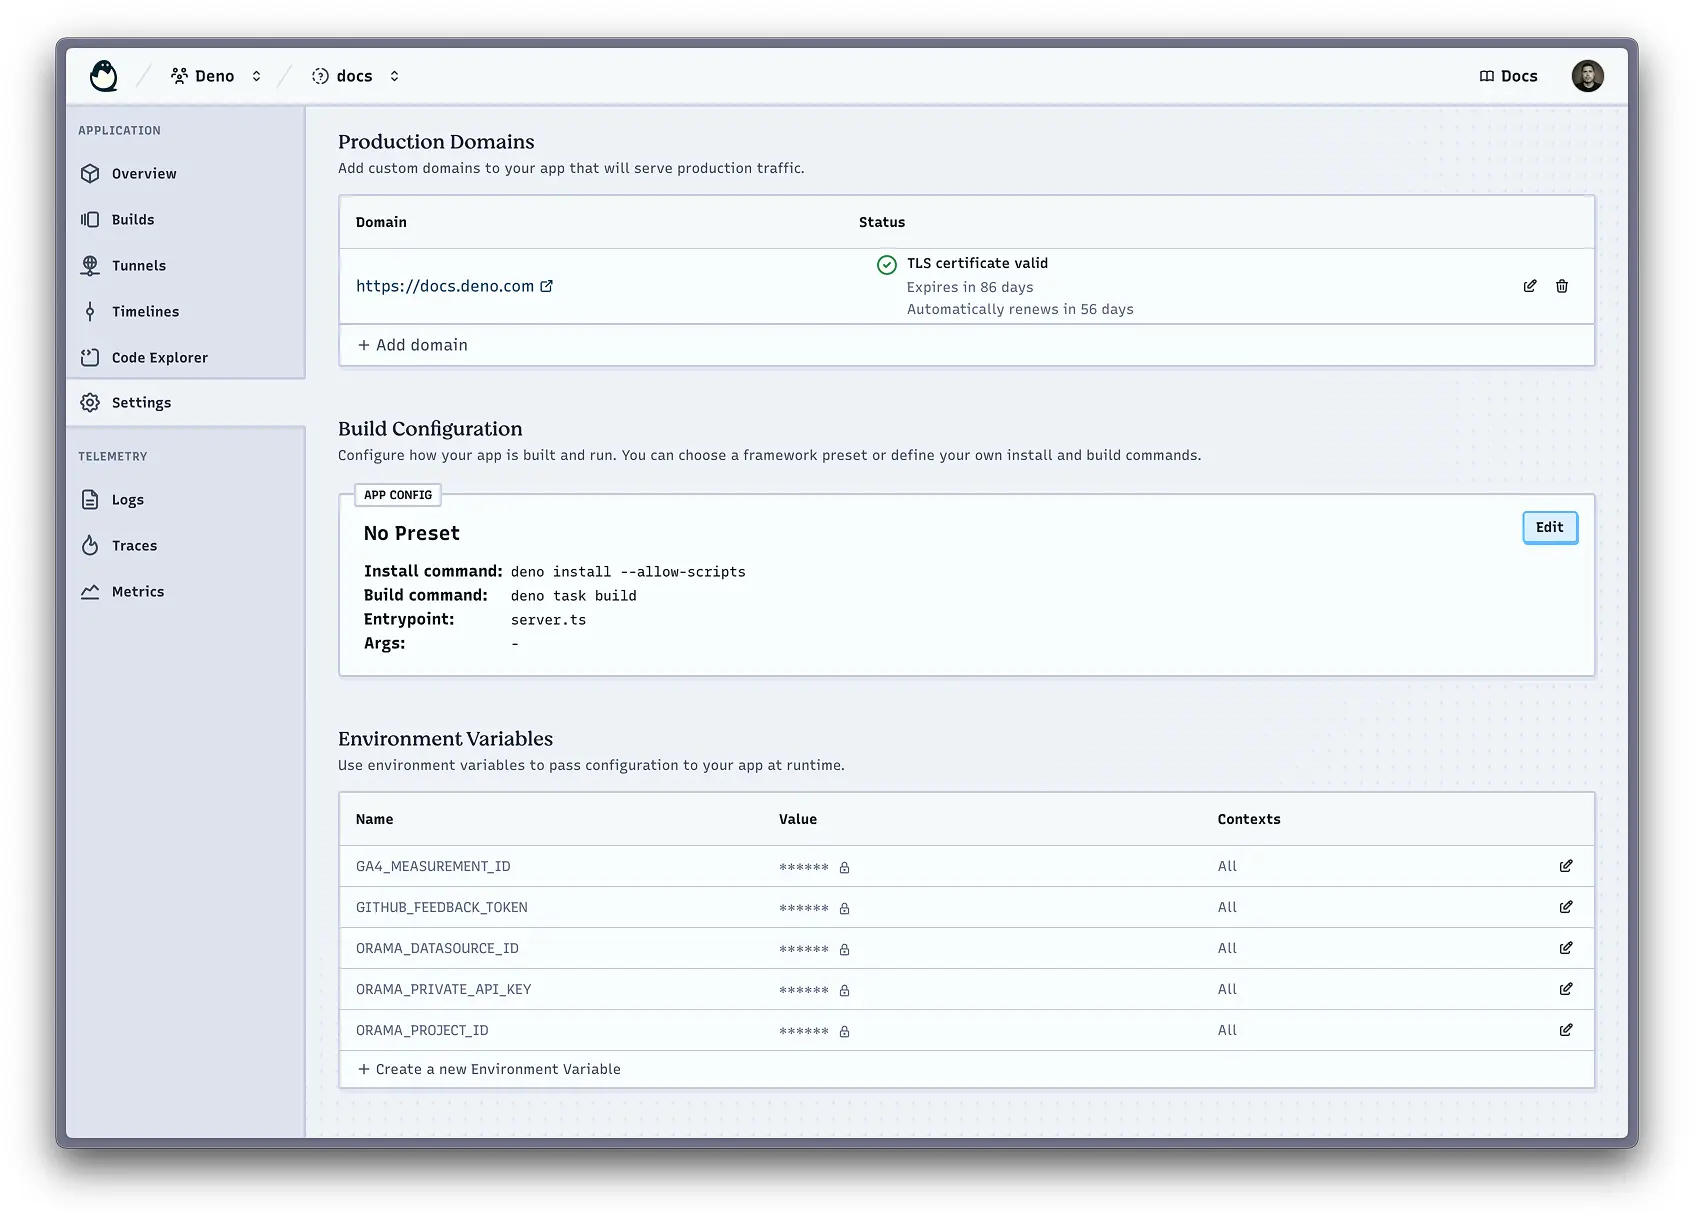
tl;dr: You can tune the infrastructure for your applications and manage things centrally
When creating a new application, you can choose to tune it as a dynamic app or a static site. This will shape the server configuration and caching behaviours with some sensible defaults.
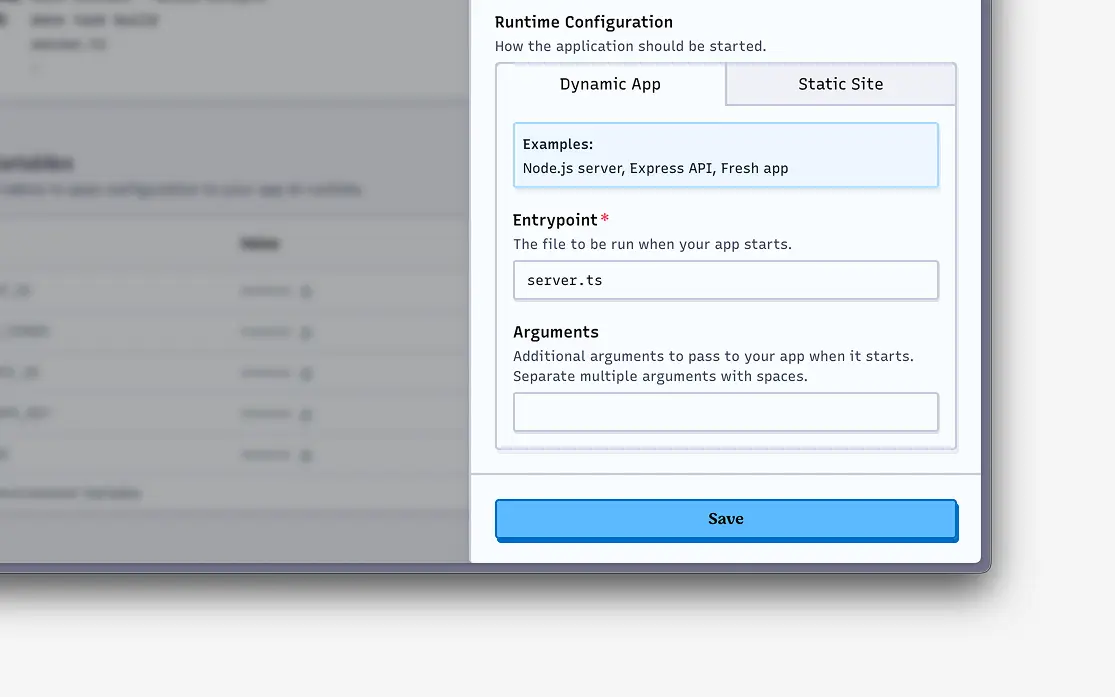
I really like this control. I’m a big advocate in keeping projects as simple as possible, so being able to serve static files and add server logic only when needed, all in one product, feels like a huge win.
You can also manage environment variables and secrets at an application level, and at the org level to help share them across all the applications in your organisation.
You’ll find controls in the console to manage these along with the ability to
import the contents of a .env file, and you can also do this from the command
line.
At your command line
tl;dr: The
denoCLI now includes commands to work with Deno Deploy
Deploy Classic has the
deployctl utility to
perform a variety of admin tasks, but the new iteration of Deno Deploy brings
things closer to the deno runtime so there is no need to install additional
tools.
Now, just by having the
Deno CLI installed,
you’ll have commands like
deno deploy at your
fingertips which lets you… well… deploy to Deno Deploy among other things.
You can also use this to manage your project’s environment variables and other configurations, push code to preview builds or the production environment, and more.
Connect environments with tunnel
tl;dr: You can close the gap between your local and production environments
One goal of the recent evolutions to Deno Deploy has been to improve the development efficiency on projects. A huge part of that can come from reducing the friction when developing locally, and closing the perceived logical gap between local and production environments.
In short, please, please let my local work be a good facsimile of what happens in staging and production environments!
The --tunnel flag
connects your local environment to your application in Deno Deploy to enable a
few handy things:
- Access the centrally managed environment variable, which eliminates the need to distribute these to the team in order for them to get their local builds working
- Serve your local version on a public URL for easier sharing, reviewing, and debugging
- Stream logs and traces directly back to your local terminal for easier observability during development
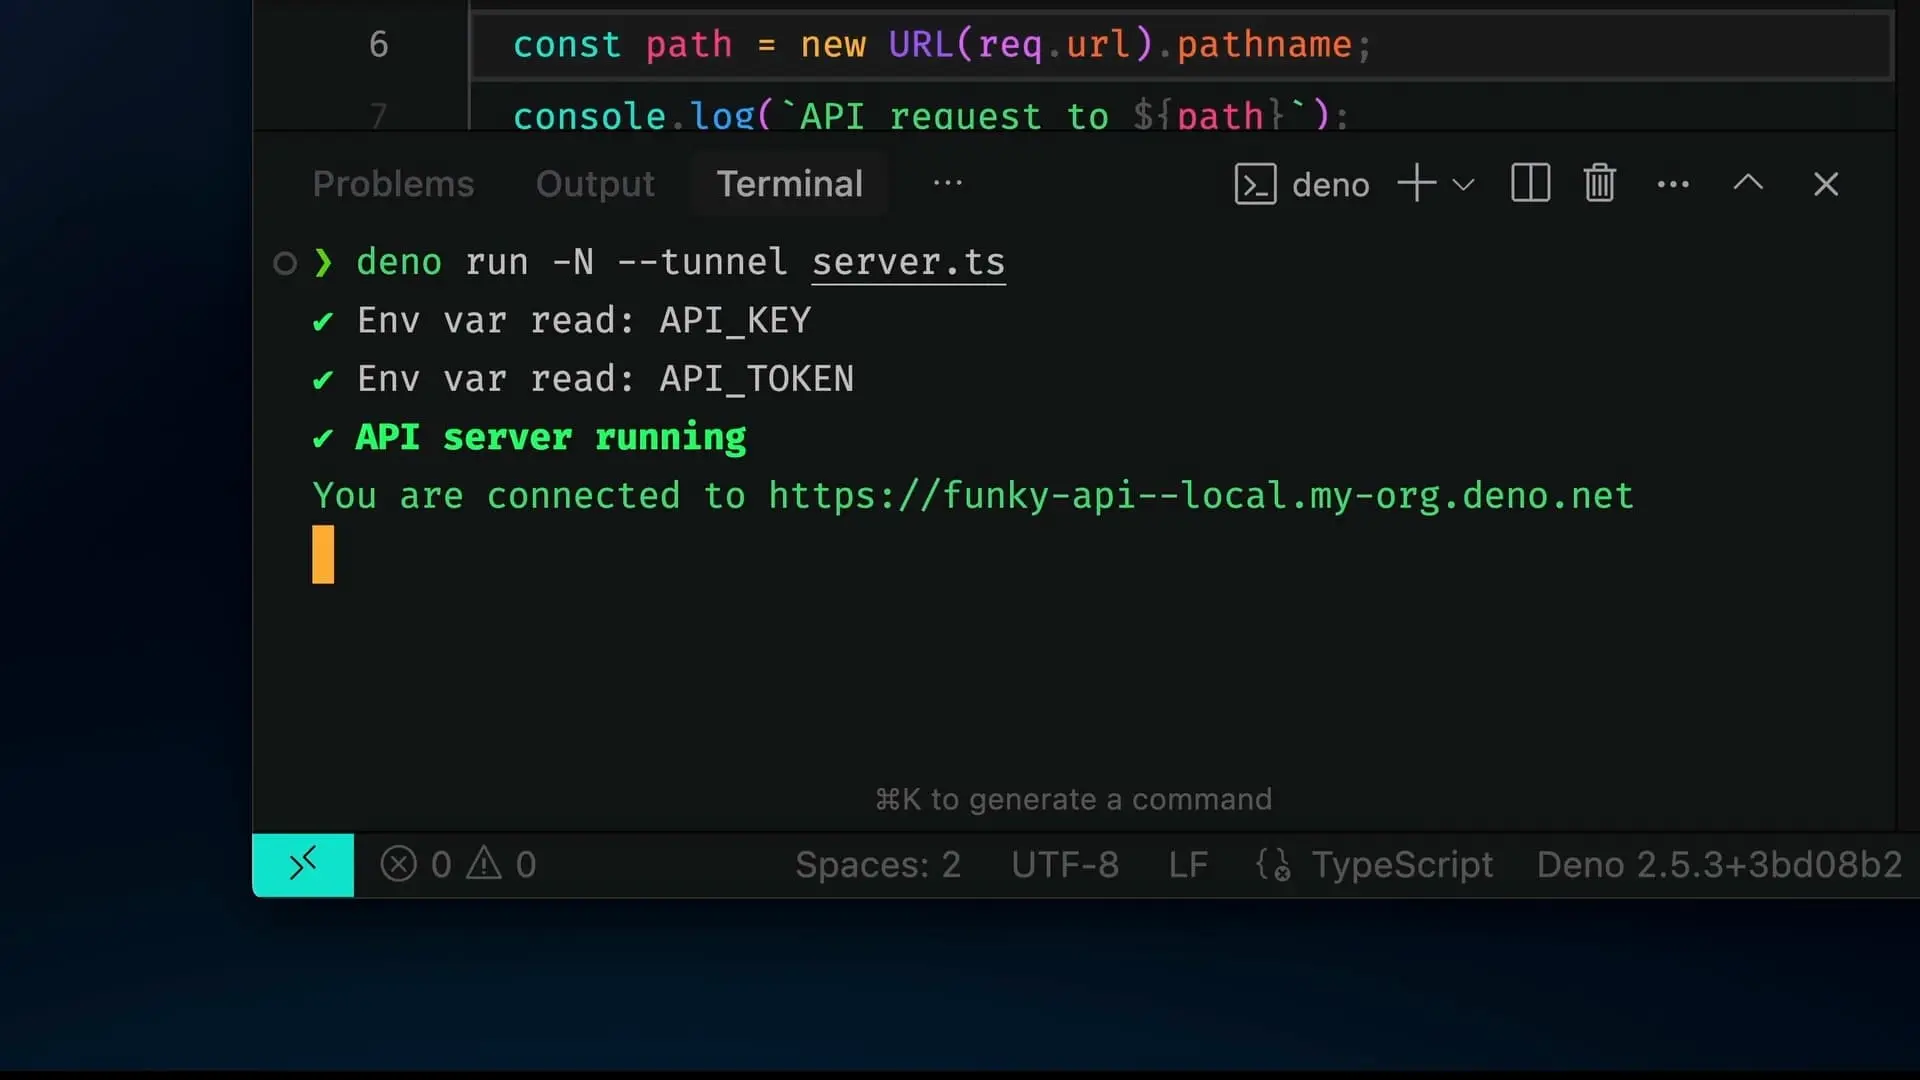
--tunnel option lets you share a link to your app running locally The --tunnel option is available to the run and task commands. Over time,
you can expect it to become even more powerful as more utilities are added.
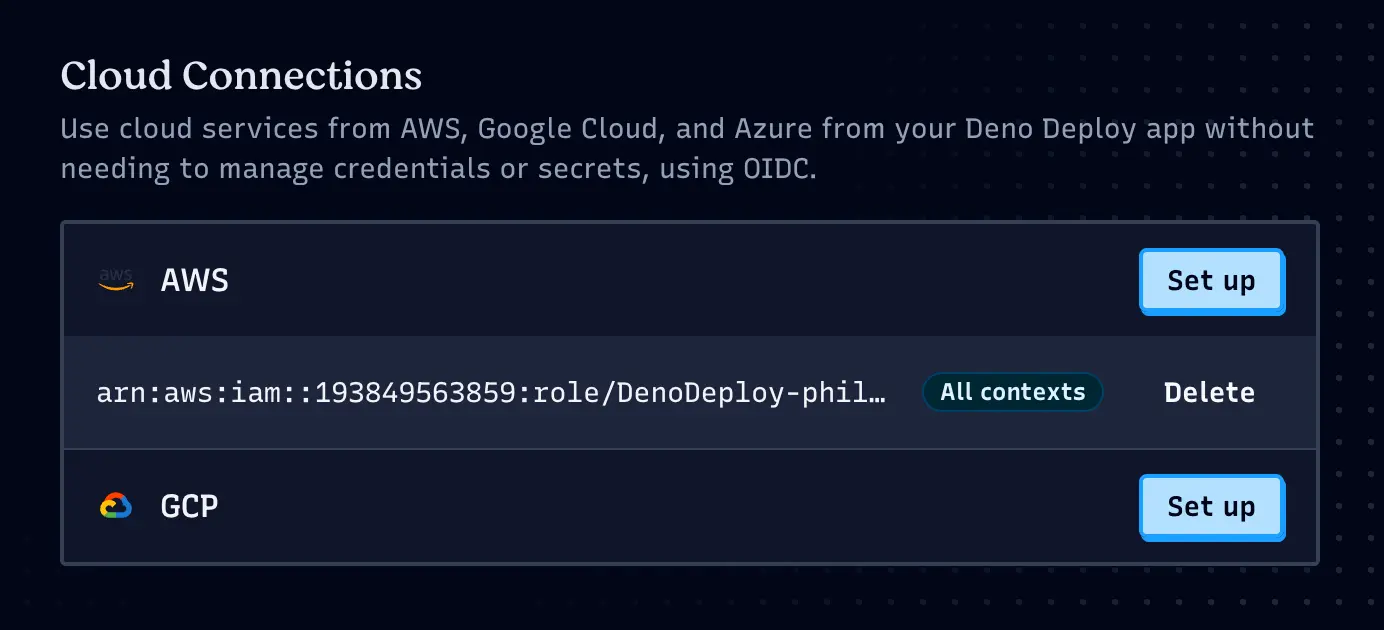
Connect your apps to AWS and GCP
tl;dr: Cloud Connect simplifies your code when connecting to different cloud services
Often we have to use resources in AWS and GCP, but it can be a pain to manually juggle credentials and configurations.
With our new Cloud Connections, you can configure an OIDC connection with your provider, then use them more simply in your code. This is another example of ways the platform can remove friction for developers, and make it easier to manage and reason about external services.
const BUCKET_NAME = "dry-pheasant-52";
const s3 = new S3Client({
  region: "us-east-2",
});
Playgrounds
tl;dr: Play with code and explore the results in the browser. Our Playgrounds got better!
There have been some big power-ups to playgrounds in their new incarnation. Playgrounds offer an in-browser code editor which deploys every time you save your changes. Now they support multiple files, and have become a simple way to explore a concept, test some code, and inspect the results all without leaving your browser tab.
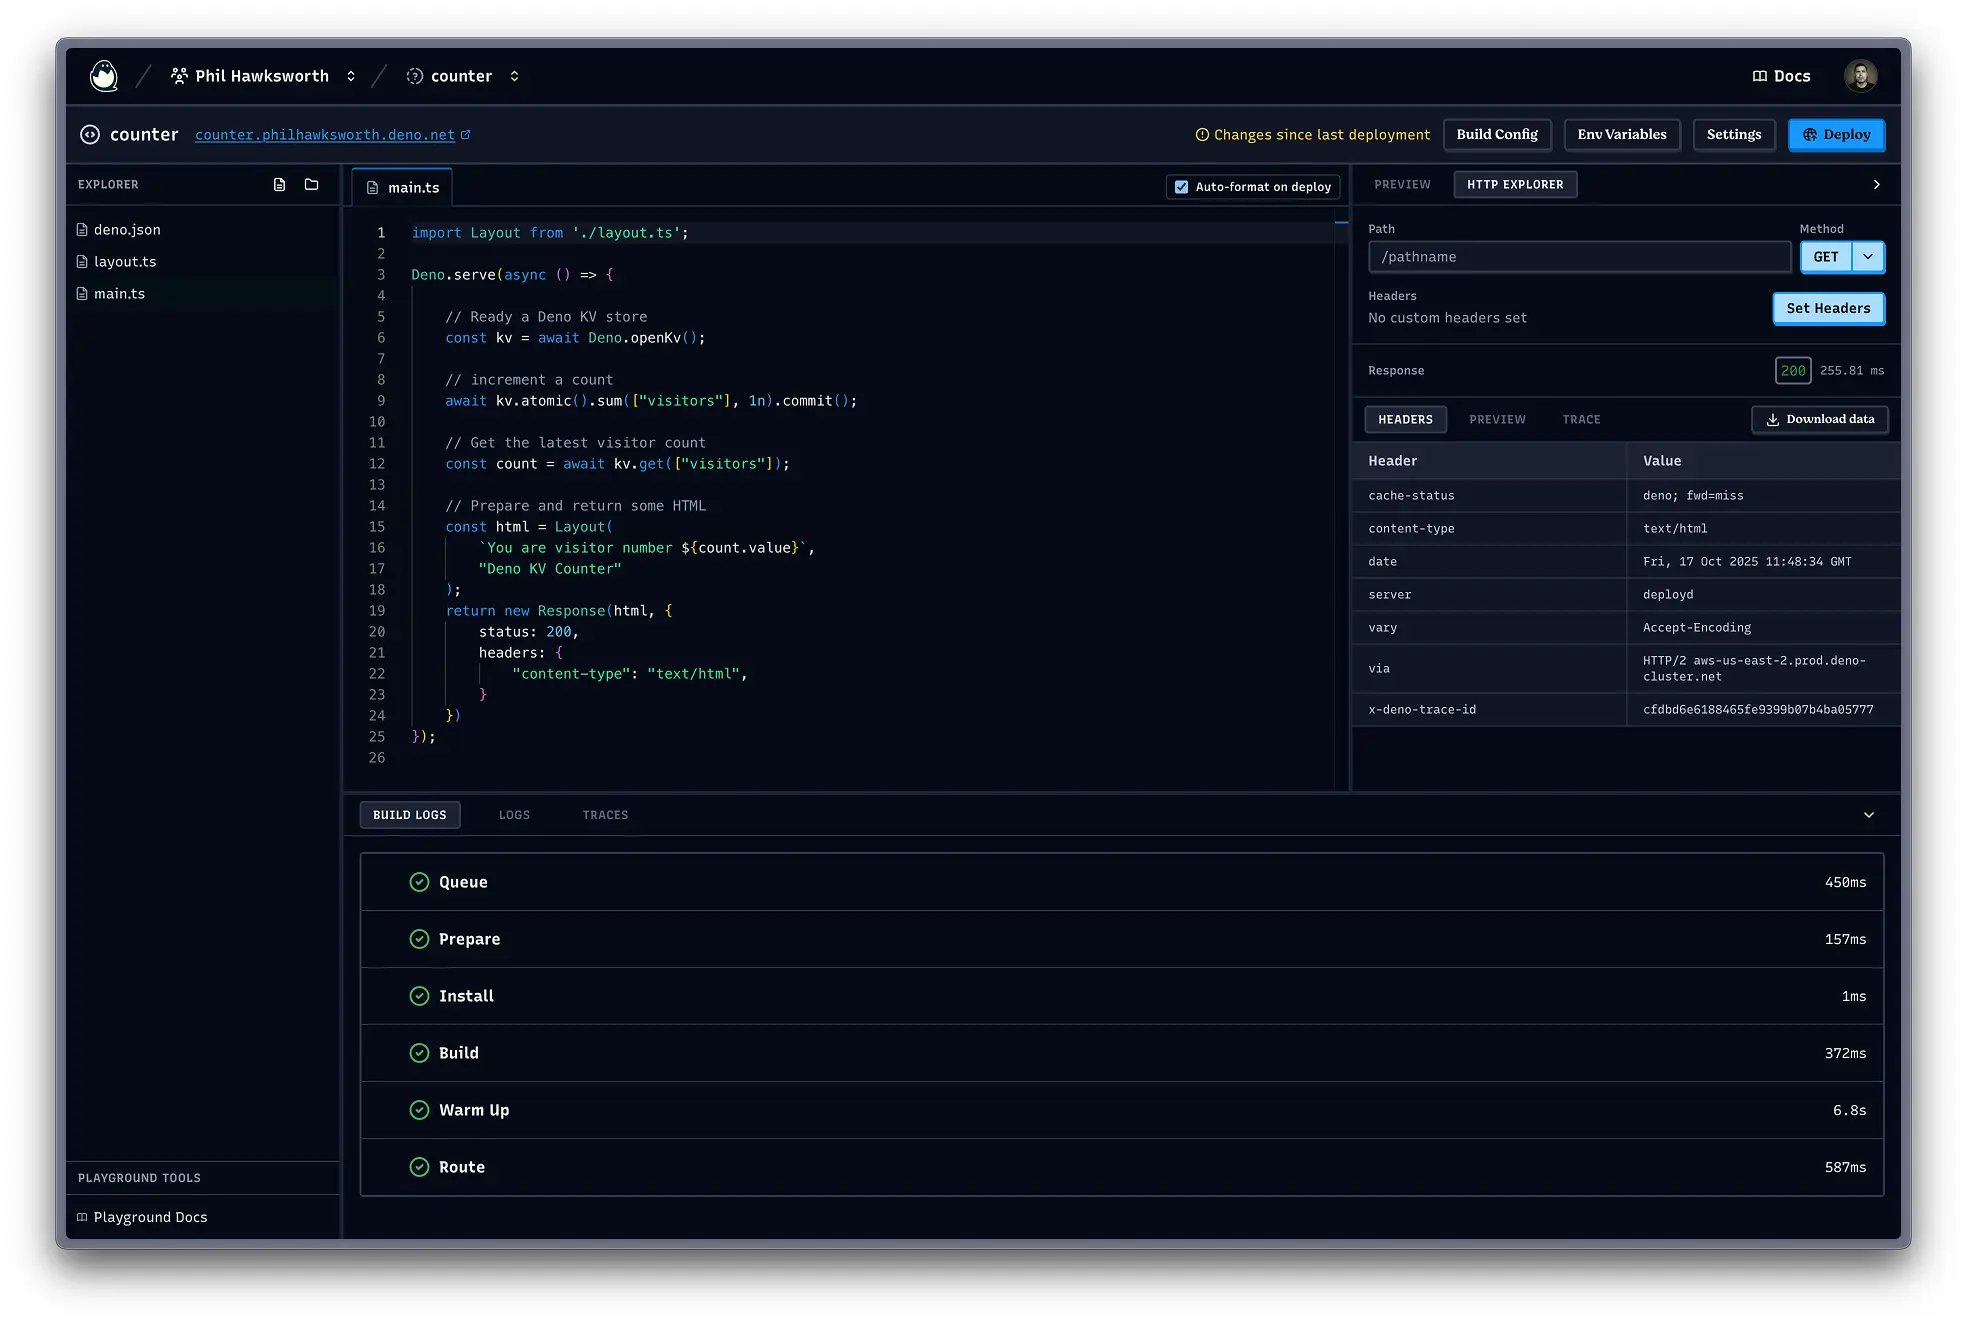
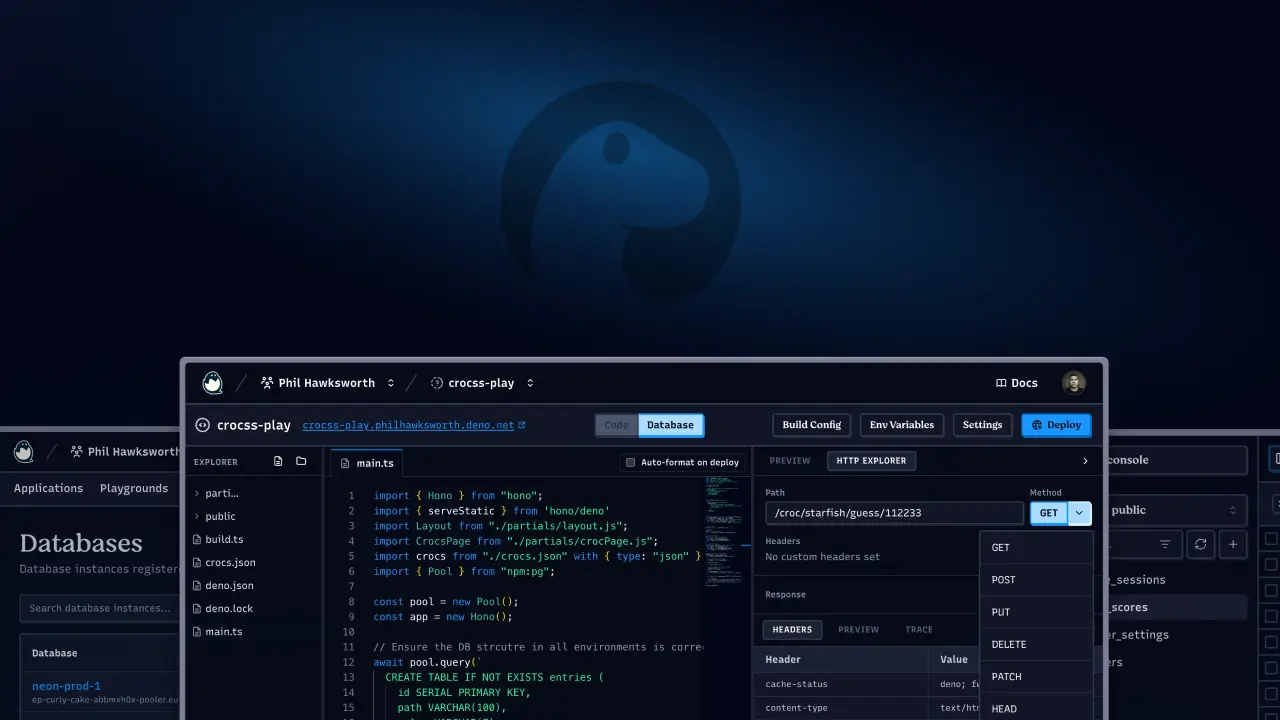
Playgrounds get built and deployed to Deno Deploy and give you the same logs and traces as your regular Deno applications, and also provide an HTTP explorer to help you test your projects.
I find it a very handy way to test APIs that I’m experimenting with. The ability to test different HTTP methods and control HTTP headers from the built-in HTTP explorer is so useful.
Playgrounds are now moved under the Applications tab in the console, and I happen to know that there are more interesting developments coming to Playgrounds before too long which will make them even more useful. I recommend you watch out for those!
Making it easier to try Deno Deploy
tl;dr: Deploy automatically applies integrations and presets according to your project code
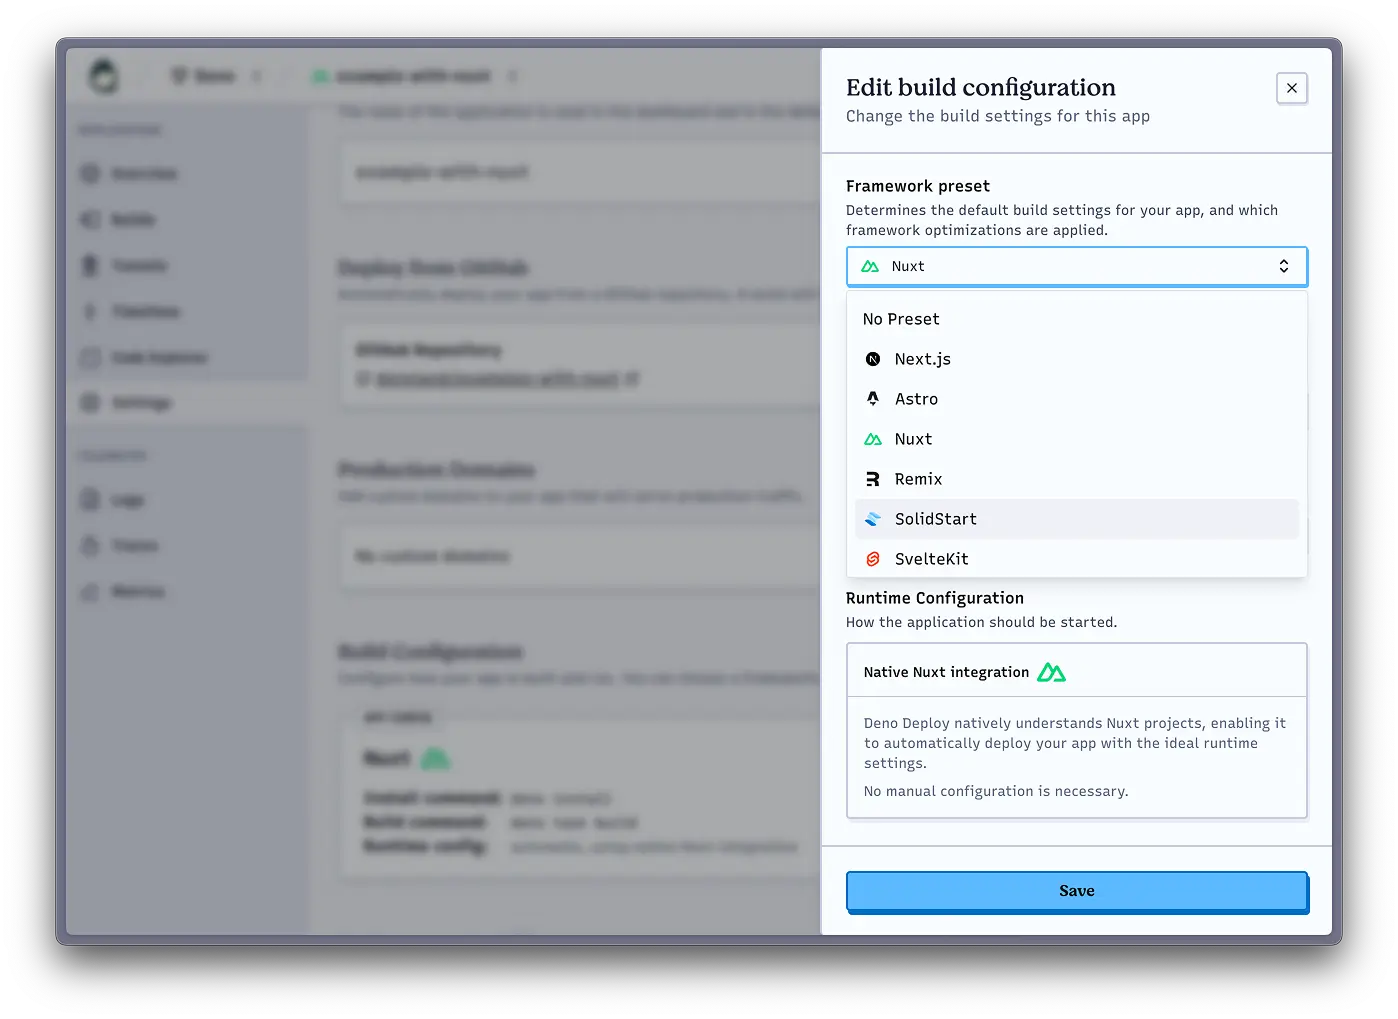
We also want to make it simple to get a project onto Deno Deploy. Whether you are just exploring to see what the fuss is about, starting a new project, or migrating from somewhere else.
When linking your repo to setup a new application in Deno Deploy, it will inspect that code to detect major tools and frameworks and optimise the environment accordingly. We have a variety of integrations and optimisations to help set things up smoothly and get the best from the environment for your application.
It’s also easy to create starter templates for your organisation or create an application from an existing code repo with Deploy buttons. These are just hyperlinks to our app creation page with some configuration parameters.
— A simple hello world site
Try one for yourself above to get a simple example site started, or see how you could create a set of project scaffolds for your team to use for bootstrapping projects by taking a look at the docs for our Deploy Button.
What’s next?
This is just a small sampling of what is available on Deno Deploy. The best way to get a real feel for how the platform is evolving is to try it.
Deploying one of the simple starter templates above can be an easy way to get a little application up and running so you have something to explore. You can sign up, create an orgnization and some apps, and start deploying things for free.
There are lots more things coming soon to the platform to help you build, deploy, and manage your web applications. I’m pretty excited about the developments happening under the surface to support some great new tools and ways for you to run code as part of your web stack.
What are you building with Deno? Let us know on Twitter, Bluesky, or Discord!