
How to document your JavaScript package


Creating and publishing open source packages is a great way to contribute to the ecosystem and community. You made something cool and want people to use it. But simply publishing your module to a registry and crossing your fingers won’t get users. Helping your users become successful with your package means not only writing concise, descriptive documentation, but also ensuring your users can access the documentation within their workflows (e.g. in VSCode) to save them time.
Thanks to JSDoc it’s easy to write documentation that is coupled with your code and can be consumed by users in a variety of formats. When combined with a modern publishing flow like JSR, you can easily create comprehensive documentation for your package that not only fits within your workflow, but also integrates directly in the tools your users consume your package with. This blog post aims to cover best practices when writing JSDoc-style comments to get your users up and running as quickly as possible:
- Why JSDoc?
- A brief intro to JSDoc
- Provide good type information
- Tags, tags, tags
- Add examples
- But what should I document?
- Use markdown
- Link internally
- Keep JSDoc up-to-date
- Audit your JSDoc
- What’s next
Why JSDoc?
While a good README answers “why should I use your package?”, good documentation should answer “how can I use your package?”. Users browsing your documentation have a problem they need to solve, and your documentation should provide them with the answer in the fewest clicks and keyboard taps.
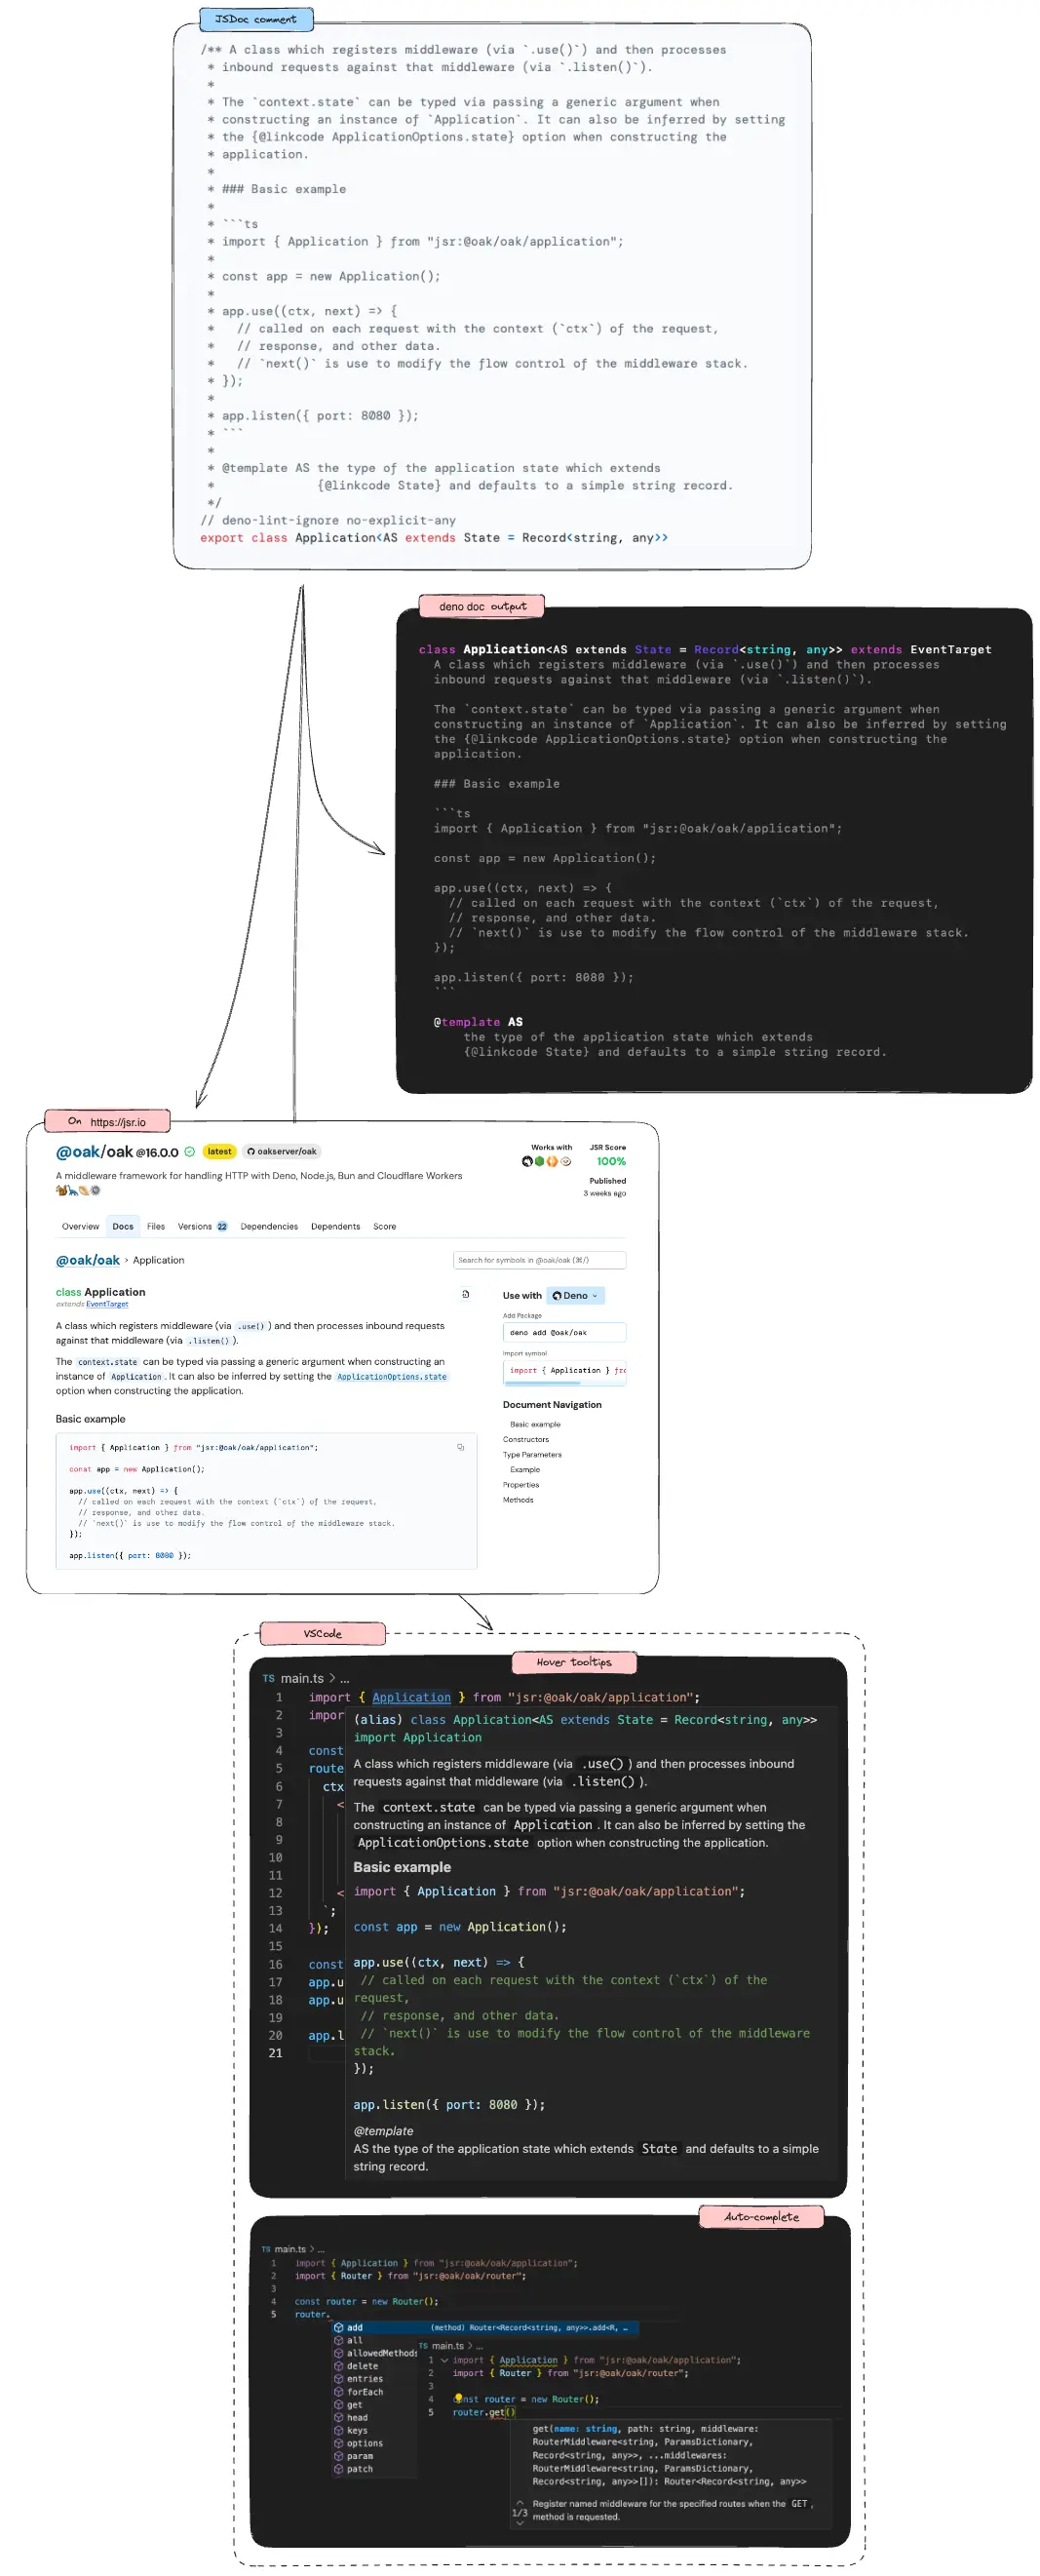
JSDoc is a great way to write reference documentation that is coupled with the code itself and can be consumed by users in a variety of formats, such as HTML, markdown, JSON, or in their IDE or text editor. Here is a quick diagram of an example JSDoc-style comment and how it appears as documentation in various mediums:
Writing good JSDoc can improve the success of your package. Before we dive into some best practices, here’s a brief high-level introduction to JSDoc.
A brief intro to JSDoc
JSDoc turns your comments in your code into a documentation object that can be rendered and displayed in a variety of formats.
JSDoc comments are any block comments that begin with /** and end with */
that precede a block of code. Here’s an example:
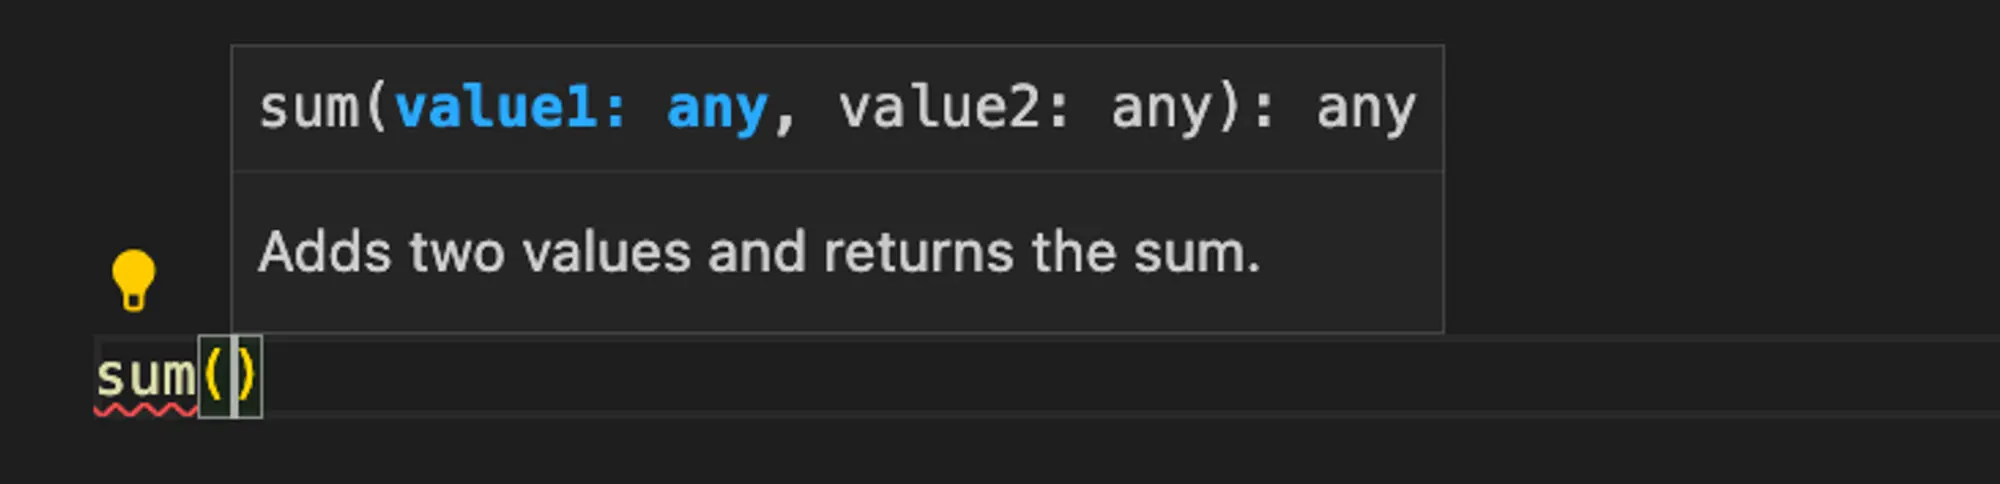
/** Adds two values and returns the sum. */
function sum(value1, value2) {
  return value1 + value2;
}
This JSDoc will then appear as a tooltip in your IDE:
JSDoc comments can span multiple lines. Each line should start with * and
should be indented by one space.
/**
 * Adds two values and returns the sum.
 *
 * NOTE: JavaScript math uses IEEE 754 floating point arithmetic, so there may
 * be some rounding errors when adding two numbers.
 */
function sum(value1, value2) {
  return value1 + value2;
}
The first paragraph of a JSDoc comment is the most important. It is a summary of the symbol and is shown in tooltips, auto-completions in your editor, and is indexed by search. The first paragraph should be a concise description of the symbol, and should be written in a way that helps users quickly understand what this function does.
For example, don’t write:
/**
 * This function takes a string in the first and returns a string. It looks for
 * all the spaces in the input string using a regexp, and then replaces them one
 * by one with an underscore. The function then returns the modified string.
 */
function replaceSpacesWithUnderscores(value) {
  return value.replace(/ /g, "_");
}
Instead, concisely describe what the function does:
/**
 * Replaces all spaces in a string with underscores.
 */
function replaceSpacesWithUnderscores(value) {
  return value.replace(/ /g, "_");
}
Additional information like the implementation details, caveats, or examples should be added in subsequent paragraphs. Because JSDoc supports markdown, you can even use headings to separate different sections.
Simple and concise summaries help users quickly filter through a list of symbols during auto-complete and find the one they need. Once they’ve found the symbol, they can read through the rest to learn about the details.
Provide good type information
After the succinct descriptive summary, it’s important to provide good type information for the symbols you are exposing in your package. This serves two main purposes:
- It allows auto-completion on parameters and return values in your editor, because the editor knows the types of the parameters and return values.
- It helps users quickly filter through the list of functions to find the one they need. For instance, if they are looking for a function that combines two strings, they can filter out functions that don’t take two strings as parameters.
Here, we’ll use TypeScript to add type information. TypeScript, one of the fastest growing programming languages, is a strongly typed language built on JavaScript that enhances code quality and maintainability, while improving developer productivity.
/**
 * Adds two values and returns the sum.
 */
export function sum(value1: number, value2: number): number {
  return value1 + value2;
}
In your editor, you’ll see the type information for the parameters and return value when you hover over the function:

When a user types sum( in their editor, they’ll see the type information for
the parameters:

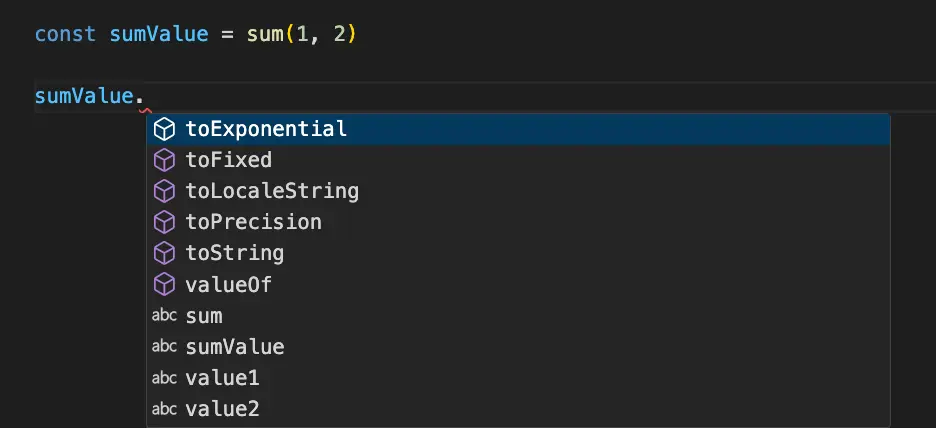
On the return value, you can immediately get completion for methods on the
returned number:
Tags, tags, tags
JSDoc supports a variety of tags that can be used to provide additional
information about your symbols, such as @param for parameters, @returns for
the return value, or @typeParam for type parameters. Here’s an example of a
function with type information and tags:
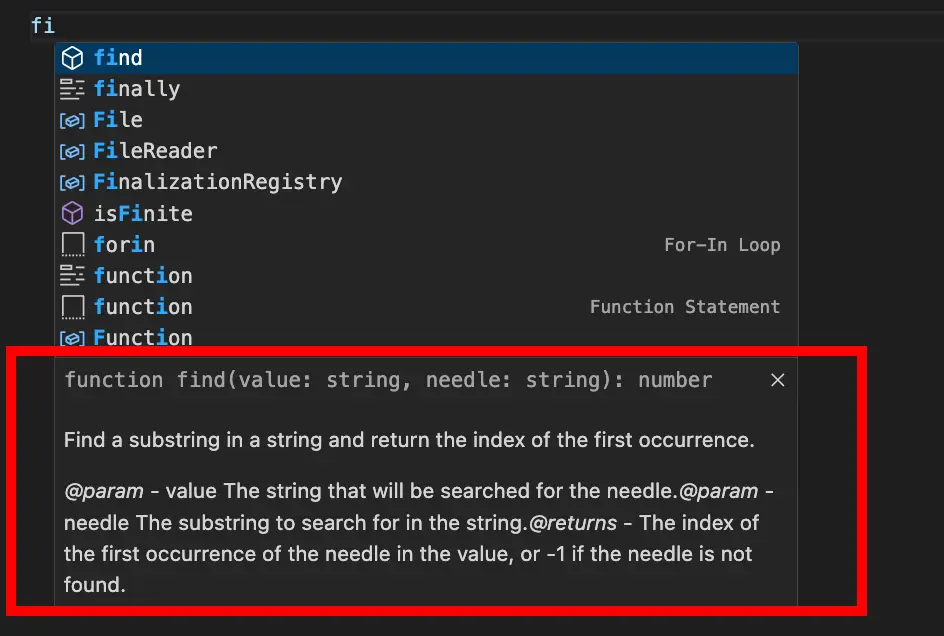
/**
 * Find a substring in a string and return the index of the first occurrence.
 *
 * @param value The string that will be searched for the needle.
 * @param needle The substring to search for in the string.
 * @returns The index of the first occurrence of the needle in the value, or -1 if the needle is not found.
 */
declare function find(value: string, needle: string): number;
In your editor, you’ll see the type information for the parameters and return value, as well as the additional information provided by the tags:
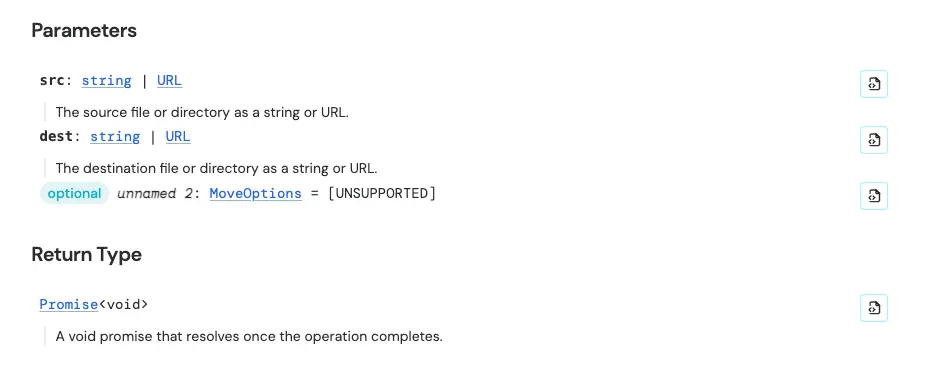
On JSR, the tags are rendered in HTML. Here’s an example of the @param and
@return tags in the JSDoc of the
move function in deno_std/fs:
Add examples to JSDoc
Examples are another great way to help users quickly understand how to use your
library. This is especially useful for functions that have complex behavior or
many parameters. Examples can be added to your JSDoc comments using the
@example tag:
/**
 * Find a substring in a string and return the index of the first occurrence.
 *
 * @example Find a substring in a string
 * ```ts
 * const value = "hello world";
 * const needle = "world";
 * const index = find(value, needle); // 6
 * ```
 *
 * @example Find a substring in a string that doesn't exist
 * ```ts
 * const value = "hello world";
 * const needle = "foo";
 * const index = find(value, needle); // -1
 * ```
 */
declare function find(value: string, needle: string): number;
The best examples are concise and demonstrate the most common use cases of your function. They should be easy to understand and can be copied and pasted into a project.
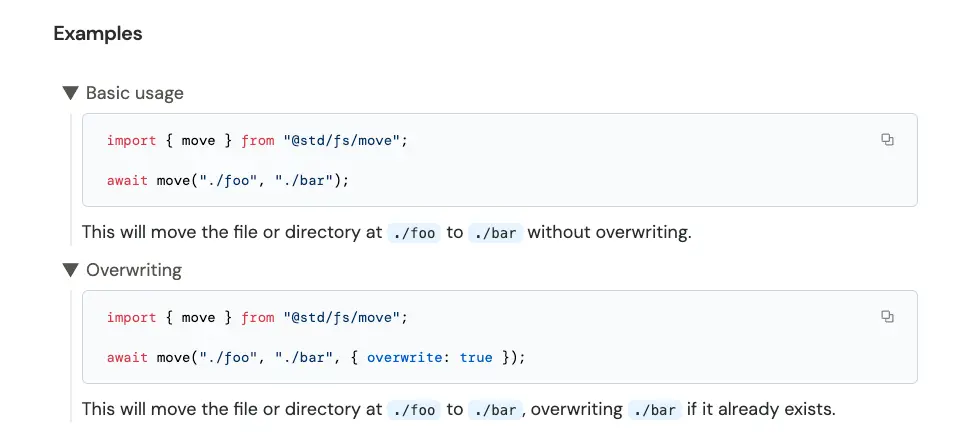
You can even provide multiple examples if there are multiple use cases worth
mentioning. Here’s an example of how multiple examples appear on JSR from
the move function of deno_std/fs:
/**
 * (truncated for brevity)
 * @example Basic usage
 * ```ts
 * import { move } from "@std/fs/move";
 *
 * await move("./foo", "./bar");
 * ```
 *
 * This will move the file or directory at `./foo` to `./bar` without
 * overwriting.
 *
 * @example Overwriting
 * ```ts
 * import { move } from "@std/fs/move";
 *
 * await move("./foo", "./bar", { overwrite: true });
 * ```
 *
 * This will move the file or directory at `./foo` to `./bar`, overwriting
 * `./bar` if it already exists.
 */
Note the text immediately following @example serves as the title, and the text
beneath the example becomes its description on JSR:
But what should I document?
You should document every symbol your package exports, including functions, classes, interfaces, and type aliases.
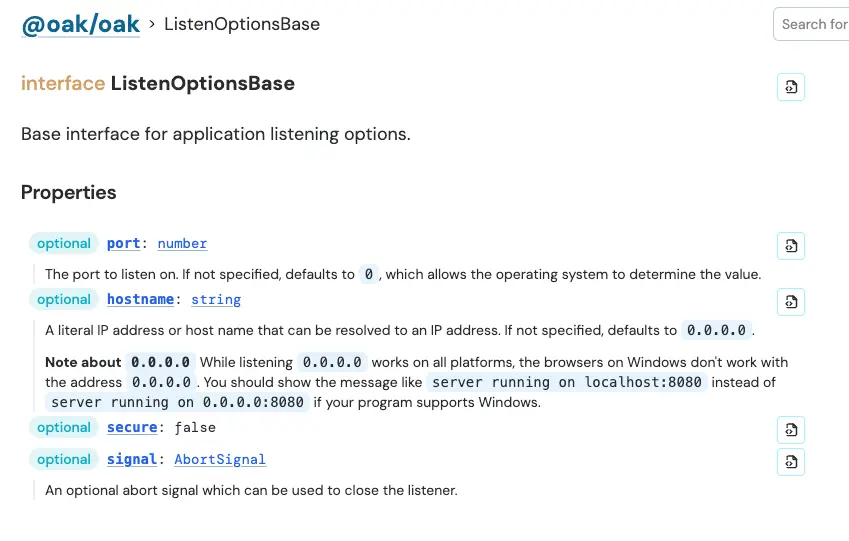
This extends beyond just one JSDoc comment per symbol. For classes and interfaces for example, you should document the symbol itself, each method or property on it, including constructors. Here’s an example of an Oak interface with JSDoc comments on its properties:
/** Base interface for application listening options. */
export interface ListenOptionsBase {
  /** The port to listen on. If not specified, defaults to `0`, which allows the
   * operating system to determine the value. */
  port?: number;
  /** A literal IP address or host name that can be resolved to an IP address.
   * If not specified, defaults to `0.0.0.0`.
   *
   * __Note about `0.0.0.0`__ While listening `0.0.0.0` works on all platforms,
   * the browsers on Windows don't work with the address `0.0.0.0`.
   * You should show the message like `server running on localhost:8080` instead of
   * `server running on 0.0.0.0:8080` if your program supports Windows. */
  hostname?: string;
  secure?: false;
  /** An optional abort signal which can be used to close the listener. */
  signal?: AbortSignal;
}
This is how the JSDoc comments on properties appear on JSR:
If your package consists of multiple modules, adding a JSDoc comment to the
top of each module file with the @module tag will be helpful. This module
comment should include a description and examples of how to use its exported
symbols.
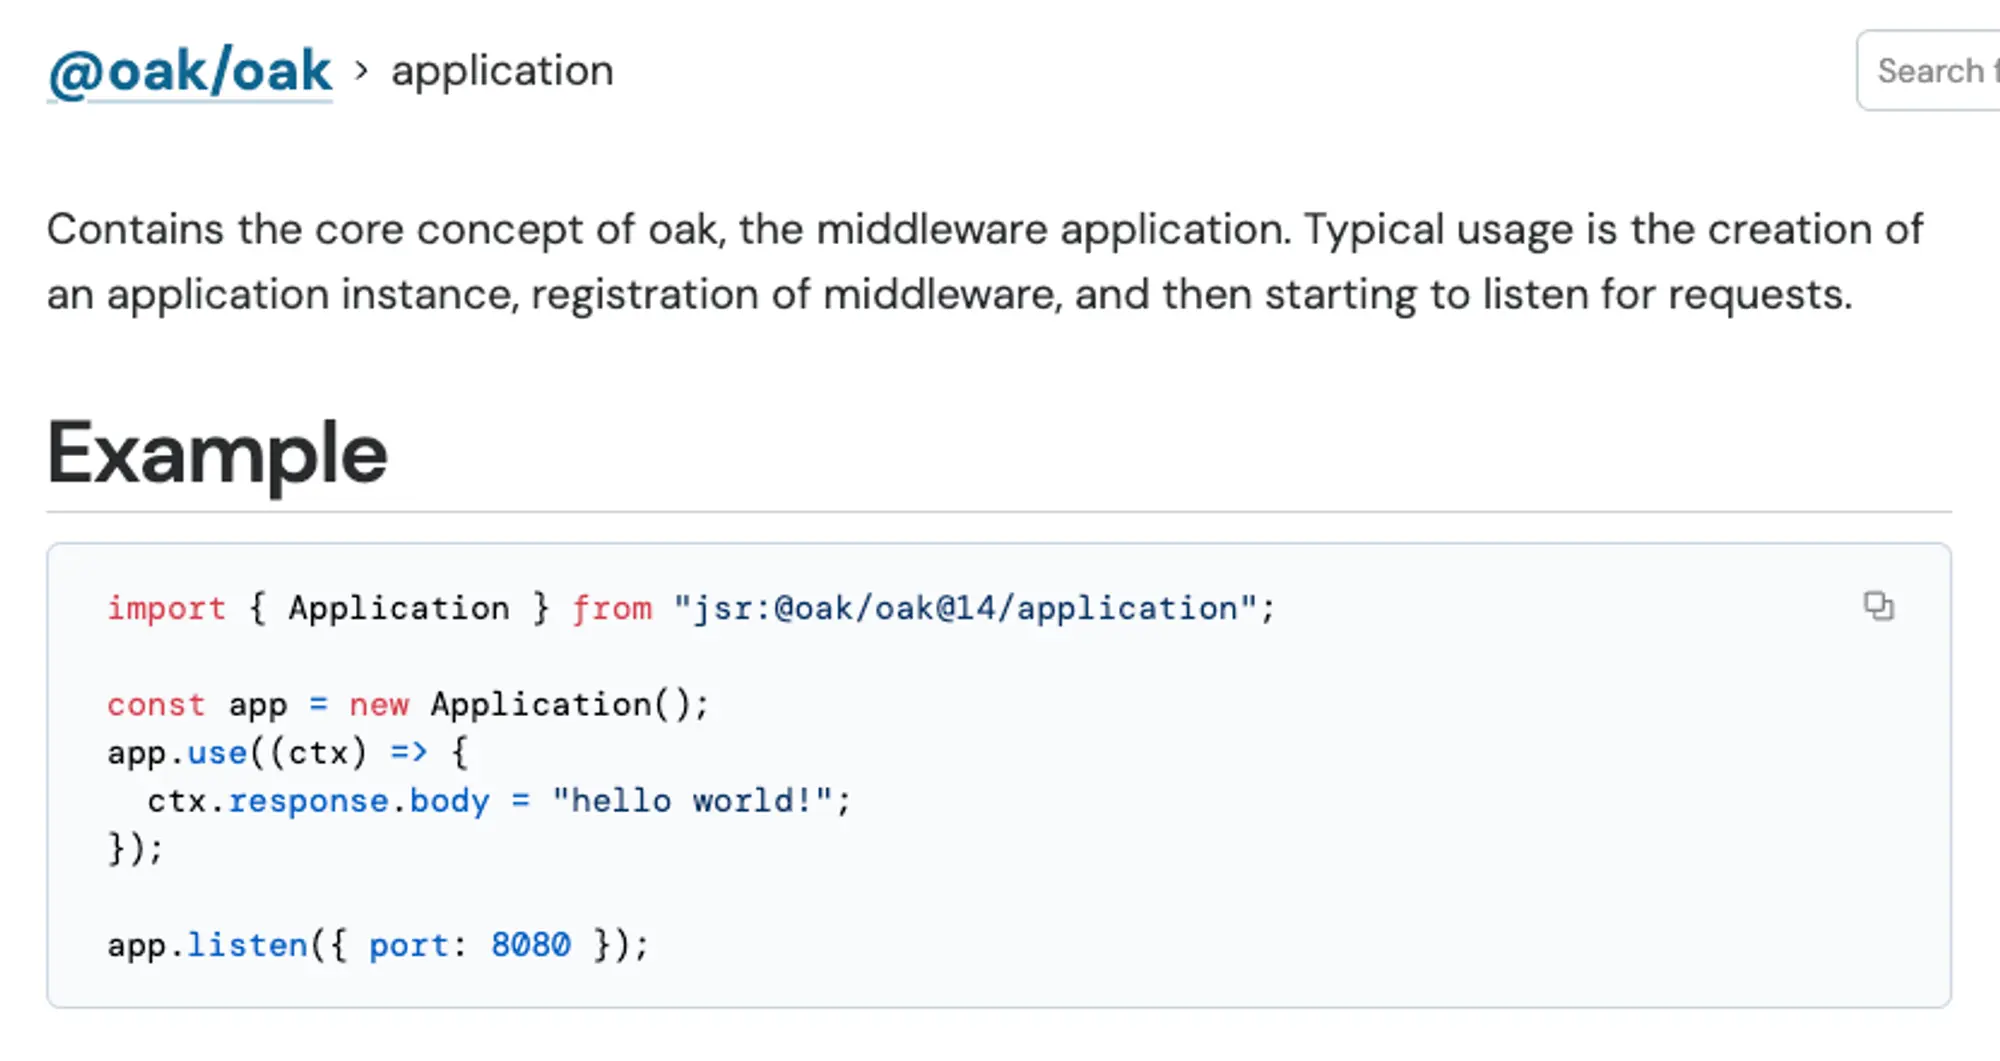
Here’s an example of @module in Oak’s
application.ts file:
/**
 * Contains the core concept of oak, the middleware application. Typical usage
 * is the creation of an application instance, registration of middleware, and
 * then starting to listen for requests.
 *
 * # Example
 *
 * ```ts
 * import { Application } from "jsr:@oak/oak@14/application";
 *
 * const app = new Application();
 * app.use((ctx) => {
 *   ctx.response.body = "hello world!";
 * });
 *
 * app.listen({ port: 8080 });
 * ```
 *
 * @module
 */
In JSR, the first paragraph becomes the description beneath the modules on the main docs page of your package:
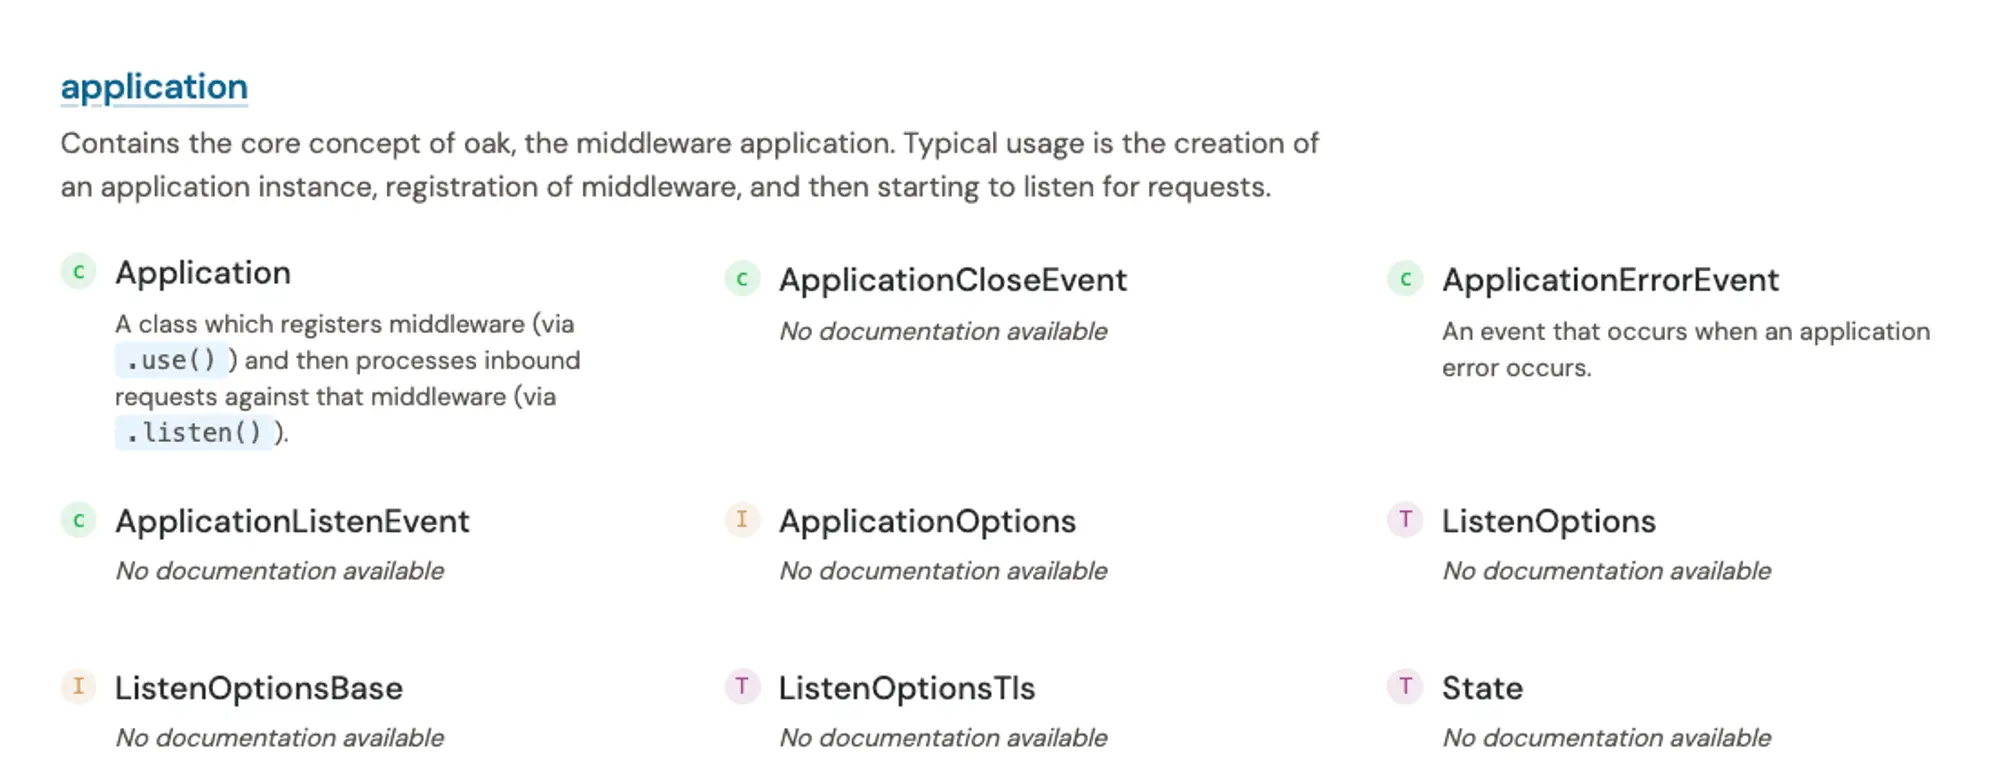
Note the main doc page only includes the first paragraph. The subsequent JSDoc comment appears when you click through to the module page:
Use markdown for a better documentation experience
Using markdown in JSDoc lets you organize your documentation in a more readable and engaging way. This can help you create documentation that is easier to understand, and allows you to link to external resources or other parts of your documentation using links.
Some useful markdown features you can use in your JSDoc comments include:
# my headingfor section headings- hello worldfor bullet points**important**for bold_noteworthy_for italic> quotefor block quotes[foo](https://example.com)for links`console.log("foo")`for inline code snippets
On JSR, you can also use [!IMPORTANT] to highlight important information in
your documentation that you want to draw attention to.
// Copyright 2018-2024 the oak authors. All rights reserved. MIT license.

/** Middleware that converts the oak specific context to a Fetch API standard
 * {@linkcode Request} and {@linkcode Response} along with a modified context
 * providing some of the oak functionality. This is intended to make it easier
 * to adapt code to work with oak.
 *
 * There are two functions which will "wrap" a handler that operates off a
 * Fetch API request and response and return an oak middleware. The
 * {@linkcode serve} is designed for using with the {@linkcode Application}
 * `.use()` method, while {@linkcode route} is designed for using with the
 * {@linkcode Router}.
 *
 * > [!IMPORTANT]
 * > This is not intended for advanced use cases that are supported by oak,
 * > like integrated cookie management, web sockets and server sent events.
 * >
 * > Also, these are designed to be very deterministic request/response handlers
 * > versus a more nuanced middleware stack which allows advanced control.
 * > Therefore there is no `next()`.
 * >
 * > For these advanced use cases, create middleware without the wrapper.
 *
 * @module
 */
This module-level JSDoc comment will appear at the top level in JSR as such:

Link internally to other parts of your documentation
Sometimes, your documentation refers to another symbol within your package. To
make it easy for your users to navigate throughout your docs, you can link
within your documentation using the
@link , @linkcode , and @linkplain
tags. These tags accept a name path or URL, from which it generates an HTML
anchor element. Here’s an example:
/** Options to use when styling text with the {@linkcode print} function. */
export interface StyleOptions {
/** The color to print the message in. */
color: "black" | "red" | "green";
/** Whether to print the message in bold. */
bold: boolean;
/** Whether to print the message in italic. */
italic: boolean;
}
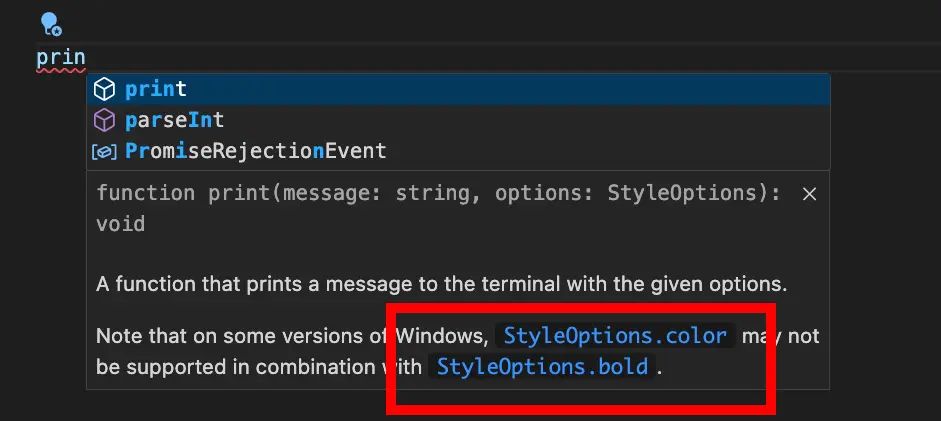
/**
* A function that prints a message to the terminal with the given options.
*
* Note that on some versions of Windows, {@linkcode StyleOptions.color} may not
* be supported in combination with {@linkcode StyleOptions.bold}.
*/
declare function print(message: string, options: StyleOptions): void;In VSCode, the hover tooltip now includes clickable links that will take you directly to the code where that symbol is defined:
Here’s an example of how @linkcode appears in JSR. In the JSDoc for Oak’s
serve function, it references Application, which is becomes a clickable link
on JSR:
You can also reference built-in JavaScript objects, like ArrayBuffer, and JSR
will automatically link to
the relevant MDN documentation.
Keep JSDoc up-to-date with code changes
One benefit about using JSDoc is that writing documentation in the comments happens at the same time as writing the code. That means anytime we need to make a change to a function, interface, or module, we can make the necessary change to the JSDoc with minimal context switching costs.
But how does one make sure that the docs in the comments are updated? Starting with docs, á la docs-driven-development, can help you spec out and reason about the requirements before writing a single line of code. Sometimes, this means catching potential problems earlier and saving time from having to re-write code. (For a more macro-level approach to this, check out “Readme-driven development”.)
If you’ve included code examples in your documentation, you can type check them
from the command line with
deno test --doc.
This is a helpful tool to ensure that your examples within your documentation
are up-to-date and working.
For example, building on our sum function from earlier, let’s add an example
with a code snippet:
/**
 * Adds two values and returns the sum.
 *
 * @example
 * ```ts
 * import { sum } from "jsr:@deno/sum";
 * const finalValue = sum(1, "this is a string"); // 3
 * ```
 */
export function sum(value1: number, value2: number): number {
  return value1 + value2;
}
Then, we can check the code in this example block by running deno test --doc :
deno test --doc
Check file:///Users/sum.ts$8-13.ts
error: TS2345 [ERROR]: Argument of type 'string' is not assignable to parameter of type 'number'.
const finalValue = sum(1, "this is a string");
                          ~~~~~~~
    at file:///Users/main.ts$8-13.ts:2:27
Whoops! After we fix the type error in the code in our documentation:
deno test --doc
Check file:///Users/sum.ts$8-13.ts

ok | 0 passed | 0 failed (0ms)
This offers a quick way to type check your code examples in your documentation before publishing.
Audit your JSDoc
If you’re publishing to JSR, it will handle all of the formatting and generation of documentation based off your JSDoc-style comments. However, if you’re interested in using your tooling to audit or test what the JSDoc comment output looks like, here are some suggestions.
deno doc <file>: This Deno command will print the JSDoc documentation for each of thefile’s exported members. This command also accepts an--htmlflag that generates a static site with documentation, and a--jsonflag to generate JSON output that you can display yourself.deno doc --lint`: This command will check for problems, such as missing return type or missing JSDoc comment on a public type. These lints help you write better documentation and catch potential issues before you publish.deno test --doc`: We mentioned this command earlier in this post, but this allows you to easily type check your documentation examples.jsdoc <directory>: JSDoc’s own CLI can generate a static documentation site with its default template, and offers a variety of configuration option flags. If the default template is a bit boring, there are others such as docdash, which provides hierarchical navigation and syntax highlighting.
What’s next?
Writing good JSDocs for your JavaScript package is critical to its success. Let’s recap the best practices:
- Write a concise summary: The first paragraph of your JSDoc comment should be a concise description of the symbol that helps users quickly understand what it does.
- Provide good type information: Type information helps users quickly filter through the list of functions and find the one they need.
- Use tags: Tags like
@param,@returns, and@typeParamprovide more information about specific parts of your function or class. - Add examples: Examples help users quickly understand how to use your library.
- Document everything: Document every symbol you are exposing in your package, including whole modules if you expose multiple modules.
- Link internally: Use
@link,@linkcode, and@linkplainto link to other parts of your documentation to help users navigate your docs. - Test your documentation: Use
deno test --docto type check your documentation examples before publishing, anddeno doc --lintto check for issues in your JSDoc comments.
By following these best practices, you can create comprehensive documentation for your package that helps users get up and running with your package as quickly as possible.
🚨️ Read more about JSR 🚨️